Friday 23 October 2015

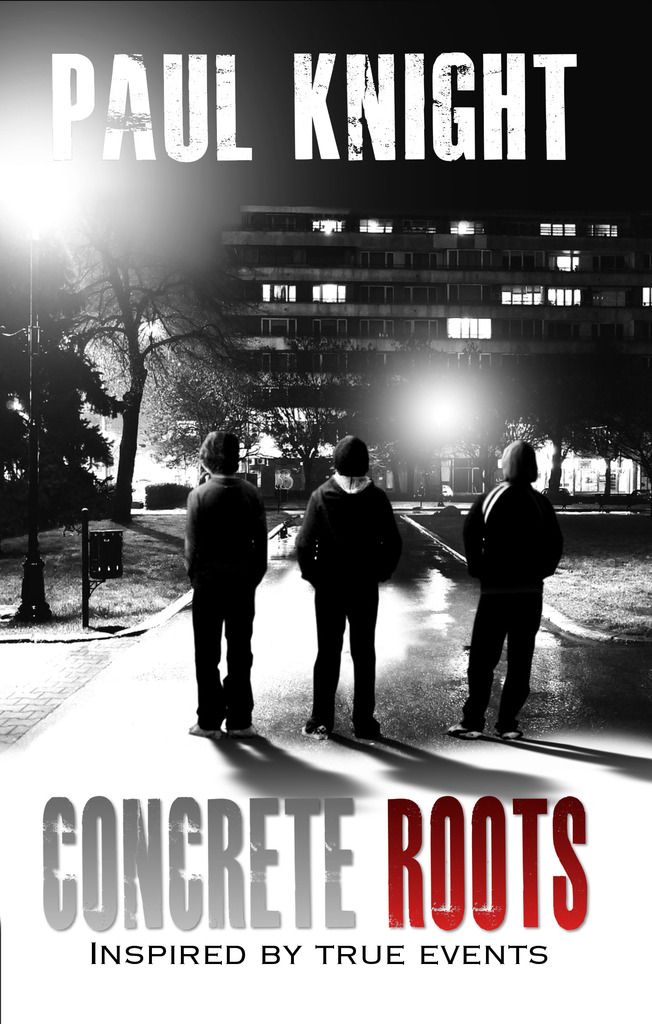
Book cover - Concrete Roots


I have some exciting news to share!

I designed a book cover for my husbands book 
Now I don't normally design for other people as I find it quite stressful and I usually
do graphics etc just for fun or to relax.
but as it was my husbands book and as I have read it a few times now, its all its various stages of life
 I felt very familiar with the story and felt comfortable having a go.

the concept and ideas changed several times, as my original idea I couldnt quite pull off
but we eventually were both pretty happy with the results.
here is the front cover


  photo concrete16 2.jpg


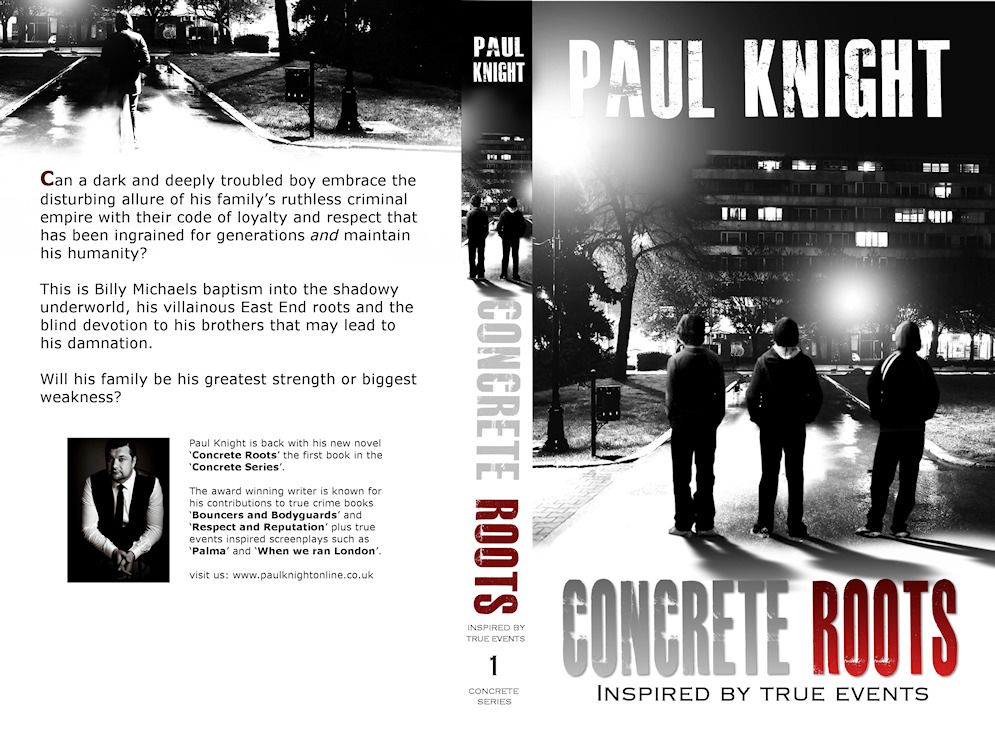
and a preview of the full cover

 photo concrete16totalcoversmall.jpg

Paul's website is HERE 


CONCRETE ROOTS – Inspired by true events


Can a dark and deeply troubled boy embrace the disturbing allure of
his family’s ruthless criminal empire with their code of loyalty and
respect that has been ingrained for generations and maintain his
humanity?


This is Billy Michaels baptism into the shadowy underworld, his
villainous East End roots and the blind devotion to his brothers that
may lead to his damnation.

Will his family be his greatest strength or biggest weakness?

Concrete Roots
 available for pre-order for the Kindle HERE
or the paperback is available on on pre-order from Amazon HERE

Wednesday 16 April 2014

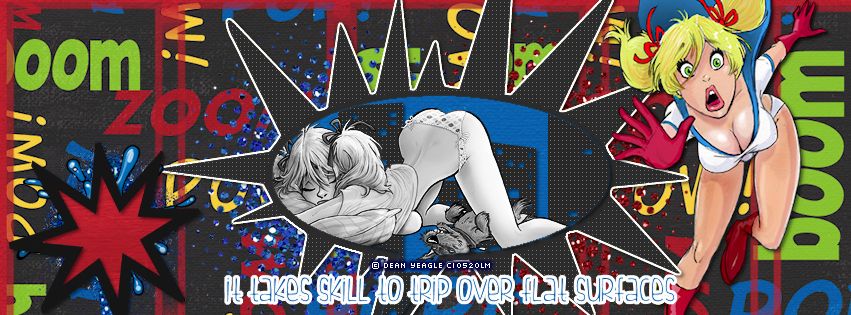
Dean Yeagle - Facebook Timeline Cover


  photo dy-skill-fbcover.jpg

click on tag to see full size cover
this tag tutorial was made using artwork by Dean Yeagle
I bought my tubes from CILM but they are now available from CDO here
scraps used Boom Pow by Sarah @Designs by Sarah
available HERE
WSL Mask number 148 from here
 add masks to your mask folder
.............................
OPEN A NEW CANVAS  851 x 315 PIXELS

open red plain paper from the kit
 copy and paste paper onto your canvas then duplicate it, 
go to Image - mirror so it covers the entire background

 open up paper 8 from the kit resize by 80% using smartsize
then apply the WSL mask number 148 to the paper,
 by going to Layers - load/save mask from disk 
click ok or apply depending on your version of PSP
then go to layers - merge group
copy and paste as a new layer onto your FB cover canvas
 duplicate it and arrange so that the boom pow wording is all over the canvas.

NEXT open up the word bubble from the kit, 
copy and paste as a new layer onto your canvas.
aow add a while edge, do this by going to 
Selections all - Selections float 
then Selections- modify-expand by 2
add a new raster layer and floodfill with white
SELECTIONS NONE
then slide the white layer beneath the word bubble layer
add a drop shadow to the white layer

next using your magic wand tool click inside the bubble word frame
go to selections modify expand by 2

then copy and paste the blue paper from the kit as a new layer
go to selections invert and hit the delete key to remove the excess

next add tube/artwork of choice, arrange inside the frame
and hit the delete key to remove anything outside of the frame.

do the same for the buildings skyline within the frame

once done go to selections none
the tube I used I also grey scaled 
by going to adjust hue and saturation 
and move the sliders both to zero.

 I added another tube/artwork of  Mandy as a super hero
cos I thought it went well. add a drop shadow and arrange to the right side.

add blue and red glitter splats from the kit,
I resized mine by 50% and added one on each side of the frame
then slide both underneath the frame and the skyline and blue paper below it.

 for the text I used a font called Fish fingers its a free font get it HERE

set to font size 36 pixels, colour blue
then go to select all- float and 
selections modify expand by 2 
and add a new layer floodfill with white
 slide the white layer beneath the text.
go to layers -merge down.

add any other elements you like,
 I added another boom shape and floodfilled it with a red paper
and a blue boom splat behind it resized by 50%

add the artist copyright and licence.
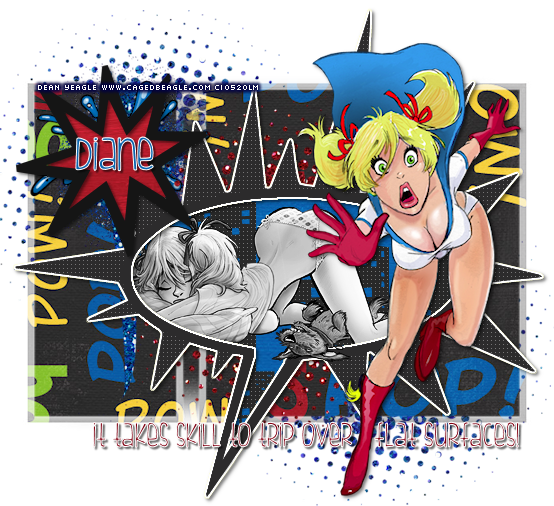
  photo dy-skill-Sarah.png

Sunday 30 March 2014

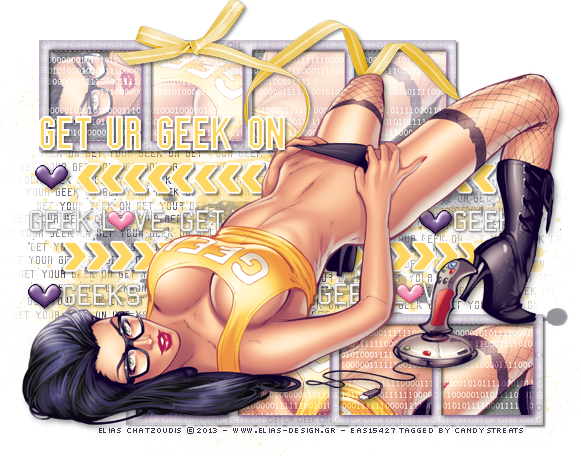
GET UR GEEK ON tutorial & snags

 photo ELIAS-GEEKON2-geekon.png
just made this tag using artwork by Elias Chatzoudis
I bought my tubes from MPT but they are now available from Elias's own site HERE
scraps used Get ur Geek on by me HERE
Extra's to snag are in my fotki  HERE
.............................
OPEN A NEW CANVAS  650 X 650 PIXELS

open up background 1 duplicate and then move them side by side

open up yellow arrows
 line up then duplicate then go to image - mirror

open up geek word art from the kit

now open up frame4 from the kit
resize by 80%  using smartsize

duplicate arrange 1 to the top left and 1 to the bottom right


 next click inside the top frame with your magix wand tool
hold down the shift key while you click inside each box
go to Selections- modify- Expand- by 2
open up paper 6 from the kit, resize by 80%
copy and paste onto your canvas as a new layer

once happy with placement go to selections invert and hit delete key to remove the excess

do the same for the bottom frame
go to selections none


then select 1 box with your magic tool again

copy and paste tube onto your canvas as a new layer

once happy with placement go to selections invert and hit delete key to remove the excess
keep doing this untill all boxes are filled
then go to selections none

go to layers merge down x3 so that all your boxed images are on the same layer now
now change the blend mode to the tube layers to either screen or hard light
whichever you think looks best


add a drop shadow to the frame layers

open up yellow ribbon from the kit
resize by 80% using smartsize
copy and paste as a new layer onto your canvas
add a drop shadow


now add tube of choice
add a drop shadow


add copyright and your name
font I used is College semi condensed

Saturday 22 February 2014

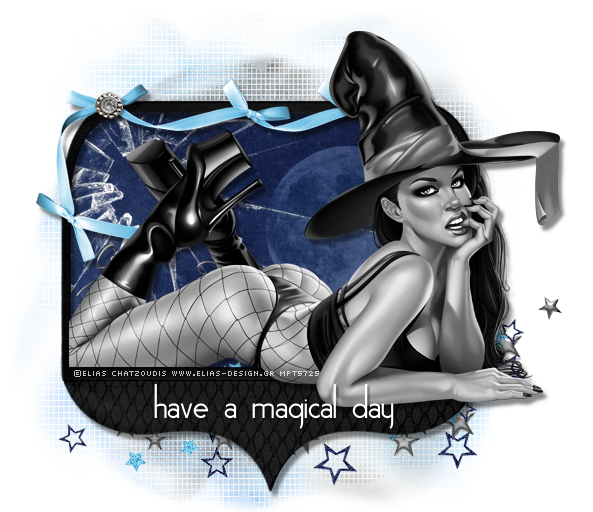
Elias - Its Magic


this tag tutorial was made using artwork by Elias Chatzoudis
I bought my tubes from MPT but they are now available from Elias's own site HERE
scraps used Abracadabra by Sarah @Designs by Sarah
available HERE
Vix big masks2 number 017 from her blog HERE
 add mask to your mask folder
.............................
OPEN A NEW CANVAS  600 X 600 PIXELS

open paper 1 from the kit resize by 
 copy and paste paper onto your canvas
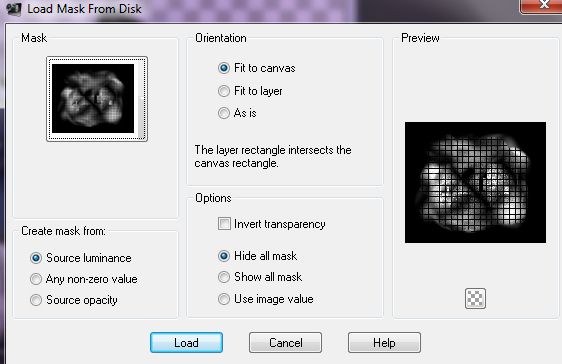
then apply vix halloween mask 017

by going to Layers - load/save mask from disk 


 photo abracadabraMASK.jpg

choose the correct mask and click load or apply.
 go to Layers - Merge - Merge Group

resize by 90%

then dupicate this mask layer
go to image - flip
then go to Adjust - Hue and Saturation - colourize
move both sliders down to zero this makes it greyscale

now open up frame
rotate right by 90
 go to Image - flip
resize by 70% using smartsize

then make the frame greyscale also by going to
Adjust - Hue and Saturation - colourize
move both sliders down to zero

 next click inside the frame with your magix wand tool
go to Selections- modify- Expand
open up paper 5 from the kit
copy and paste onto your canvas as a new layer
arrange to your liking, I arranged the paper so i could see the moon.
once happy with placement go to selections invert and hit delete key to remove the excess

then still with your selection active
copy and paste the broken glass from the kit
and hit delete key to remove the excess

go to selections none

add a drop shadow to the frame layer

open up blue ribbon2 from the kit
resize by 60% using smartsize
then rotate right by 90
copy and paste as a new layer onto your canvas
add a drop shadow

open up gem2 from the kit
resize by 15% using smartsize
copy and paste as a new layer and place over the ribbon
add a drop shadow

now add tube of choice
I greyscaled this particular one by going to

Adjust - Hue and Saturation - colourize
move both sliders down to zero

add a drop shadow

then  slide the opacity down  to 50%
on the tube so you can see through it
and with your selection tool carefully select the areas of her leg that overlap the frame
hit the delete key to remove the excess

slide opacity back up to 100%
then duplicate the tube
 go to Layers - Properties change the blend mode from normal to soft light

add copyright and your name
font I used is Noir-et-Blanc
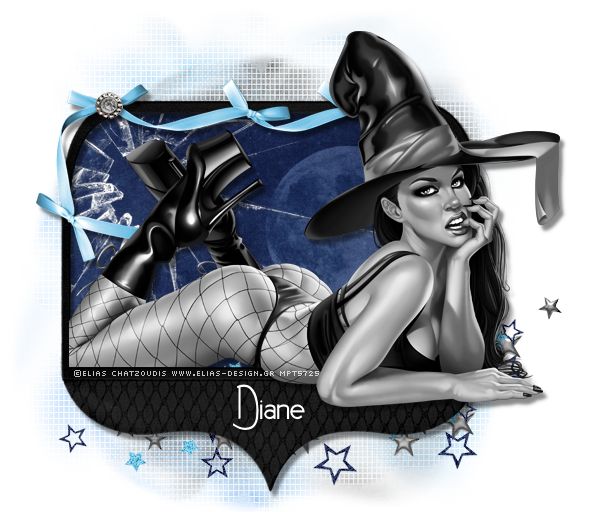
  photo abracadabra1Diane.png

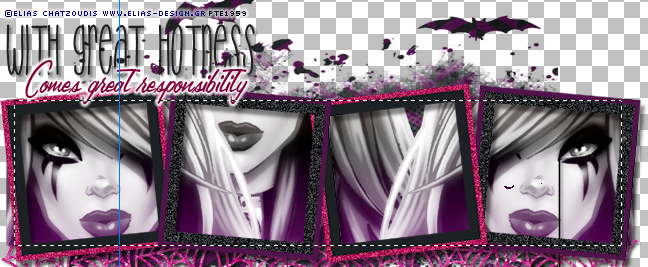
Great Hotness - tag tutorial

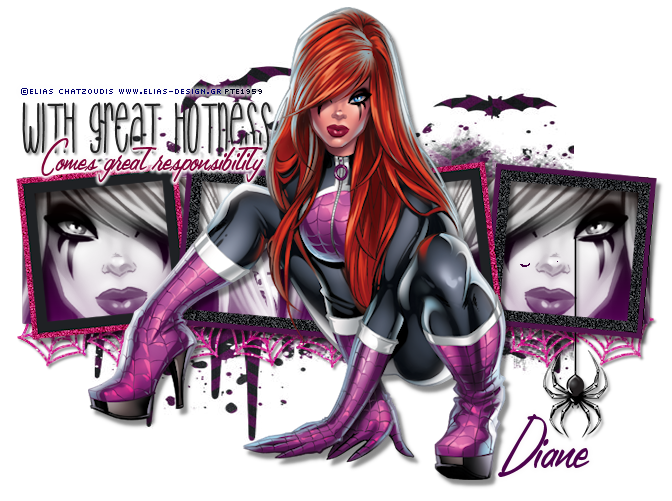
 photo greathotnessDiane.png

this tag tutorial was made using artwork by Elias Chatzoudis
I bought my tubes from PTE but they are now available from Elias's own site HERE
scraps used Arachnid by Sarah @Designs by Sarah
available HERE
Halloween Mask 0905 by VixPSP HERE
add mask to your mask folder
.............................
OPEN A NEW CANVAS  700 X 500 PIXELS

open paper 2 from the kit resize by 70%
copy and paste paper2 onto your canvas
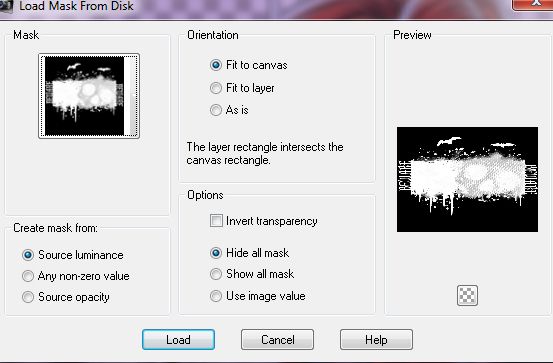
then apply vix halloween mask 0905

by going to Layers - load/save mask from disk 
choose the correct mask and click load or apply.

  photo greathotnessMask.jpg
depending on your version of PSP.
go to Layers - Merge - Merge group 

open up  frame 2 resize by 90%
copy and paste as a new layer onto your canvas
add a drop shadow

using the selection tool in PSP
draw out rectangle and while its still selected
 completely fill the selection with tube of choice
do this by keep copying  and pasting each tube as a new layer
 then when happy with placement of all tubes go to
selections invert and hit the delete key to remove the excess from each tube layer
untill you are left with just the rectangle filled with your tube
it will look something like this...
  photo greathotnessSelection.png
now go to selections none

next merge down till all the tubes are on the one layer
adjust hue and saturation to zero


*next step is optional 
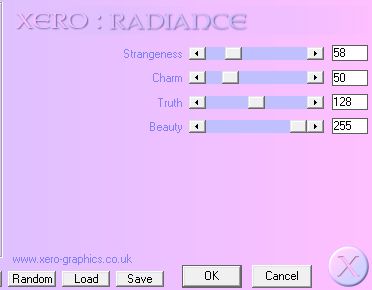
then go to Plugins - Xero Radiance using these settings

 photo catwoman-radiance.jpg 

now floodfill on a new layer with gradient of choice
there are some great free ones HERE OR HERE

  then change the blend mode to screen
by going to Layers- Properties and in the drop down menu choose 'Screen'
you can play with different gradients, and different blend modes for different effects..

add spider from the kit resize by 35%
add a drop shadow

add the pink web line resize by 95% slide beneath the frame and rectangle layer

add a drop shadow
I used 2H 2V opacity 48 blur 3

Add your text or name
fonts I used were too tight set to 72 get it HERE
and  lamplighter Script set to 48 get it here
 photo greathotnessDiane.png

Friday 21 February 2014

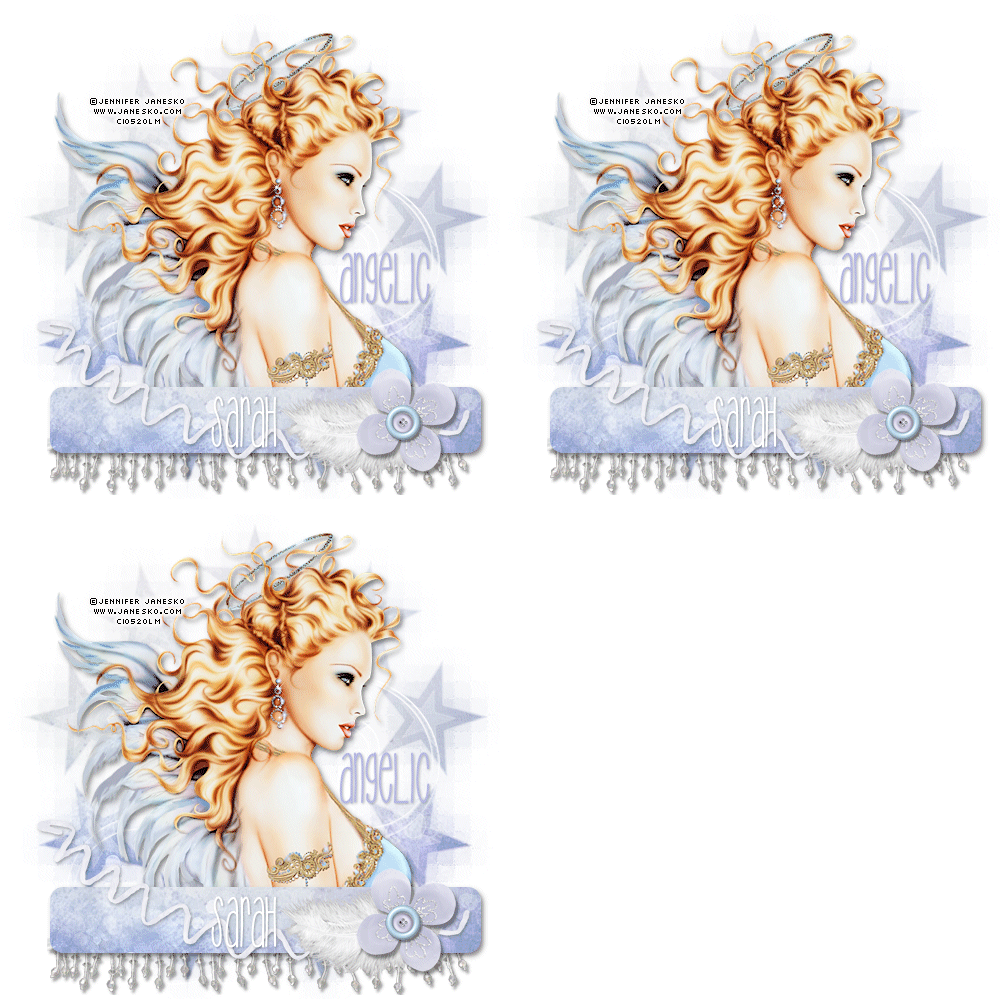
ASCENSION - JANESKO

  photo Angelic-Sarah.gif
this tag tutorial was made using artwork by Jennifer Janesko
although my tube was bought from CILM, her tubes are now available from CDO HERE 
scraps used 'Ascension' by Designz by Sarah available HERE

Mask 360 by VixPSP HERE
 .............................................................................
open a new canvas 500 X 500 pixels
floodfill with white

open up paper5 from the kit
 and copy and paste as a new layer onto your canvas

 apply mask
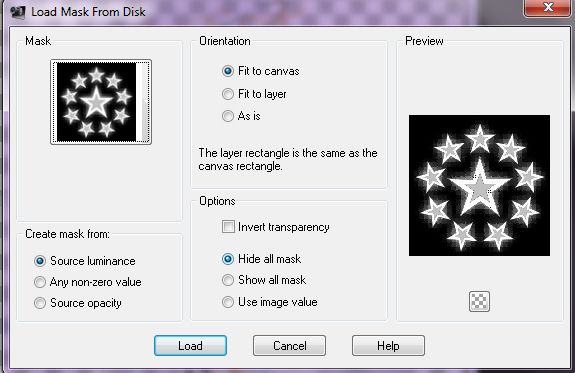
by going to LAYERS - LOAD/SAVE MASK - LOAD MASK FROM DISK
select vix mask number 360 
use these settings
  photo vixmask360.jpg
click load
go to Layers - Merge - Merge Group 

add tube of choice, I resized mine by 80% but depends which tube you are using
add a drop shadow


open up a paper of choice, and using your selection tool, on these settings below

  photo selection1Ascension.jpg
make a selection on the paper about 400 pixels wide and depth about 4-5 grey squares
it will look a bit like this below
  photo selectionAscension.jpg

now go to EDIT - CUT 
then paste as a new layer onto your tag canvas.
 add a drop shadow of choice

open ribon1 from the kit, resize by 70%
slide this layer beneath the rounded rectangle layer
add a drop shadow

add the branch from the kit, resize by 80%
then go to image - flip

next add the feather 2 from the kit
resize by 30% add a drop shadow

add flower 4 from the kit,
resize by 30% add a drop shadow

then add button1 from the kit,
resize by 20%
add a drop shadow


make sure you add your name and copyright before you animate.
for names on this tag I used a font called Too Tight
font set to size 72


ANIMATION
use your freehand selection tool use these settings
Photobucket
with your mouse left click carefully around the earing or whatever part you want to add sparkle to.
when you have done around the entire earing double click to make the selection

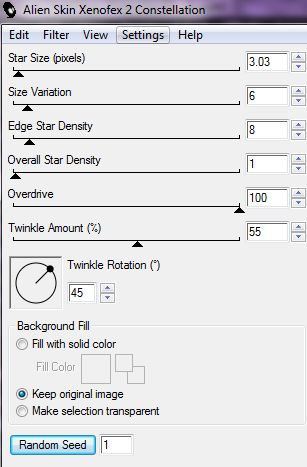
then go to Effetcs - Effects – Plugins  - Alienskin xenofex 2 – constellation
use the settings below
  photo selectionConstellation.jpg
(if you wanted a more subtle effect then just change the density to a lower number
you want it more bliny then change the density to a higher number)

then go to selections none


then go to Image - copy merged- and paste into Animation shop
 
back to PSP
click undo button twice
and go to Effect- Plugins - Alien skin Xenofex2 - constellation with the the same settings 
but this time hit the random button.
 
then go to Selections none
then copy merged and paste into Animation shop after current frame

back to PSP
click undo twice,
go to Effect- Plugins - Alien skin Xenofex2 - constellation with the the same settings,
 hit the random button one last time.
go to Selections none- copy merged and paste into Animation shop after current frame one last time

now save your tag as a gif, I hope you enjoyed this tutorial
save your tag

Saturday 14 September 2013

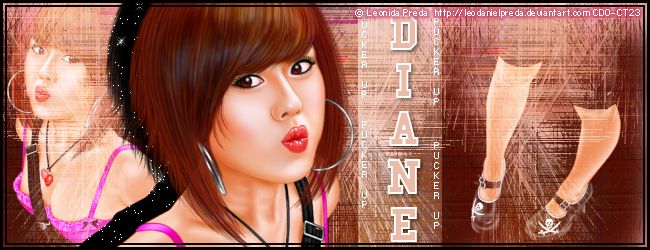
Pucker Up - Old school PSP tutorial

  photo pUCKERuP-IANE.jpg

click on the tag to view full size
this tag tutorial was made using artwork by art by Leonida Daniel Preda
tubes are available from CDO HERE

...................................................................................
open up a new canvas 650 x 250 floodfill with white

add tube then duplicate it, arrange next to each other
go to layers - merge down

then go to Adjust -Blur - Gaussion Blur 10


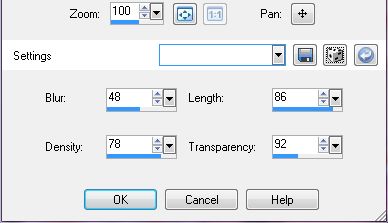
then go to effects- texture effects- fur
using these settings
 photo FurSetting.jpg
now duplicate this layer

go to image - mirror

go to Layers - merge down

duplicate merged image

then go to image - flip

this should fill your background with a pattern of
blended colours that match your tube

now add tube again as your main image on the left

duplicate it and move slightly to the left

next apply the constellation effect
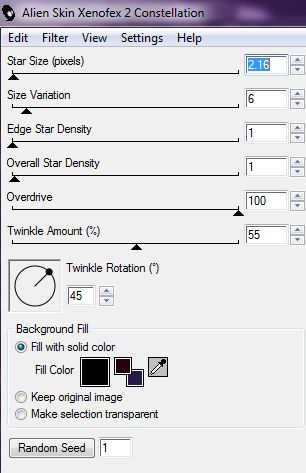
 go to Effects – Plugins  - Alienskin xenofex 2 – constellation
use these settings
 photo constellation.jpg
add smaller tubes and slide this layer beneather the main imge
 change blend mode to screen
by going to Layers - properties- and change the drop down from normal to screen

add rectangle selection down the height of the tag, where you will add your name
floodfill with white - change blend mode to soft light


add your name in COLLEGE font, white foreground stroke 2

add the text 'pucker up' font fff urban size 8 direction down foreground null
 photo FfUrbanfont.jpg

selections all - selections float -floodfill with black
modify - contract by 3

then hit the delete key to remove the excess

then selections - modify - contract by 2 floodfill with black again

then contract by 2 again and hit the delete key

this should give you the double frame effect around the edge

add artist copyright and save your tag.


Saturday 17 August 2013

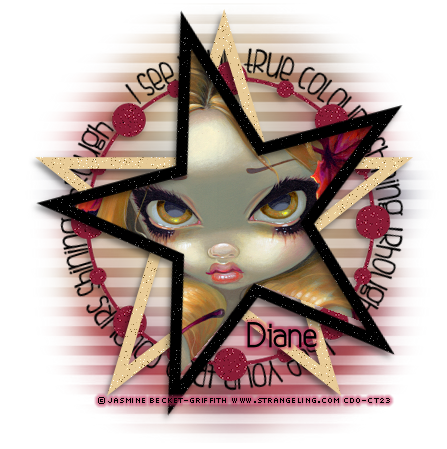
True Colours - old school tutorial

 photo TrueColours-Diane.png
click on the tag to view full size
this tag tutorial was made using artwork by Jasmine Becket-Griffith
tubes are available from CDO HERE
CropCircle font HERE
Mask 12 by Weescotslass HERE
extra's/snag's are available from my fotki HERE
...............................................................
add masks to your masks folder
..............................................................

open up a new canvas 650x650 pixels
you can always crop later...

copy and paste tube onto your canvas
go to Adjust -Blur - Guassion Blur 
change the ratio to 20

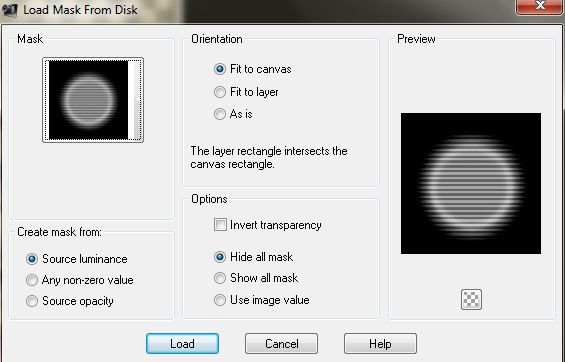
and apply mask 12
by going to LAYERS - LOAD/SAVE MASK - LOAD MASK FROM DISK
 photo mask.jpg 
click load
go to Layers - Merge - Merge Group

 then resize by 80%

Copy and paste tube again

click on your preset shape tool foreground black, background null
I chose a star -width 15 see settings below
 photo StarVector.jpg

convert to raster layer


go to Image - Rotate Left by 15

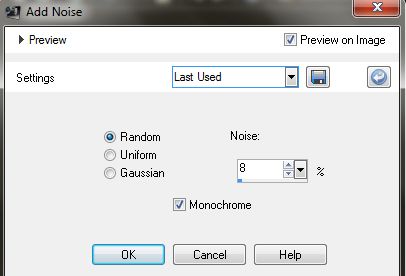
then add noise by going to
Adjust -  Add/Remove Noise -Add Noise
use these settings

 photo addnoise.jpg

then click inside the star with the magic wand tool
go to selections - expand by 2
then make your tube layer the active layer by clicking on it
and then go to Selections invert and hit the delete key to remove the excess

go to selections none

then add another star using the same method as before
 this time using a lighter colour I used colour code #e8cb97

add the same noise as before.
and slide this layer beneath the black star

add drop shadows to both stars

next select the text tool
cropCircleDingbat font size 472 colour - #881c35
hit the - comma key on your keyboard it will give you a shape
convert to raster layer


add noise same as before
 resize 90%
add drop shadow
slide this layer beneath the 2 stars

clcik on the preset shape tool
and choose the Ellipse option
background fill with any colour and foreground null
you want it to be about the size of the crop circle shape you made earlier
when happy with placement and size
click on the text tool make sure your background fill is black and foreground is null

 hover your mouse over the edge of the circle untill a little A appears.
when it does click and write your text

(The font size very much depends on the font you choose and the size of your circle)
I used fish fingers font size 36 background black - foreground null

once happy with your text
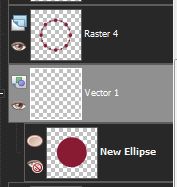
click on the tiny plus sign in the layers pallette on the text layer
it will change to a minus sign
 photo VectorCircle.jpg
and will open up a hidden layer - delete the bottom one by clicking on the little eye
this will delete the circle but leave your text.

convert to raster layer and add a drop shadow

add artists copyright and your name and save your tag
hope you found this tutorial useful 

Sunday 11 August 2013

Circles and Stripes

  photo Dirk-Vanessa.png
This free supplies tutorial was written using PSP 9

For this tut I am using the fantastic artwork of Dirk Richter
you can purchase his tubes from CDO HERE

needed:
Vabs mask DBV42 & DBV80 from her site here
add the masks to your mask folder
free font used - Crop circles dingbat HERE
..................................................................
before we start.....
Add the masks to your mask folder

save this stripe pattern below
just right click and save it..

  photo CandysTreats-StripePattern.jpg
.................................................
Open a new canvas 600 x 600 pixels

 Open up my stripe pattern you saved
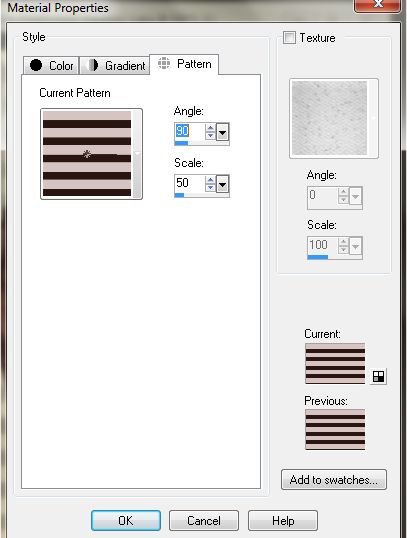
click the foreground in the matarial pallette choose pattern
see below for my settings
then floodfill the canvas with the stripe pattern
 photo stripePatternsettings.jpg
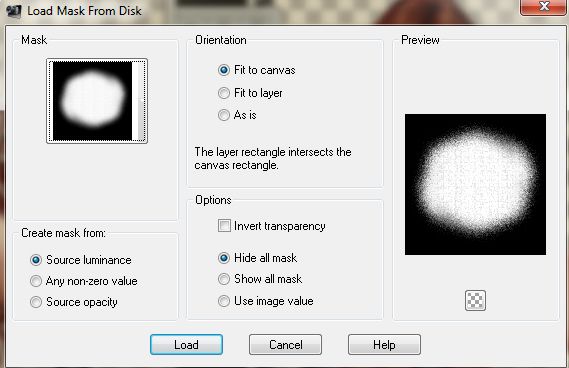
then add a mask ,
do this by going to Layers- Load/save Mask - Load mask from disk
Choose the mask named DBV80 and use these settings

 photo vabsmask80settings.jpg
click on apply...
go to Layers - merge group
resize  by 80%


new raster layer  -
using the paint bucket tool floodfill with a red/brown colour to match your tube
I used colour no. #660603
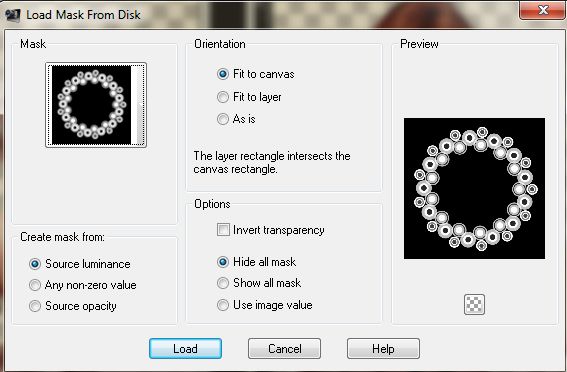
now add the mask , do this by going to Layers- Load/save Mask - Load mask from disk
Choose the mask named DBV42 and use these settings
 
 photo DBVMASK42.jpg
click on apply...
go to Layers - merge group
resize  by 80%

next choose the font tool, (its the big 'A')
 FOREGROUND COLOUR #d6c4c3 BACKGROUND NULL - SIZE 550 STROKE 2
now look for the dingbat font in the dropdown menu these are my settings
 photo CROPDINGBATFONT.jpg
press the letter v key and your dingbat should give you a shape
go to - layers - convert to raster
arrange to the centre of the canvas

add tube of choice as a new layer,

add a drop shadow
 
add your name and copyrightm save and your done..

I hope you enjoyed my tutorial

Friday 2 August 2013

Birdsong - old school tutorial

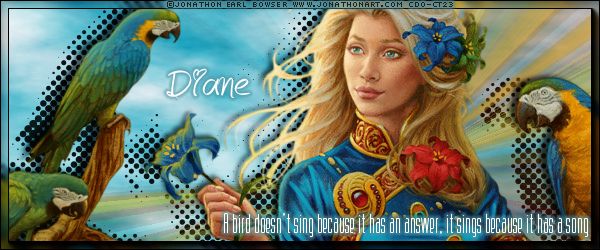
  photo CDO-Birdsong.jpg
click on the preview to see the tag full size
.......................................................

I have used the artwork of Jonathon Earl Bowser
you will need to purchase a licence to use this artists work HERE

old school tutorial
using plugins / filters -
VanDerLee - Unplugged
VanDerLee - Halftone
 MuRa's Meister - Clouds
fonts used FAKE PLASTIC font for the quote  HERE
Jellyka - Love and Passion font HERE- for my name
......................................................................................................
open up a new canvas 600 X 250 PIXELS


floodfill your canvas with white
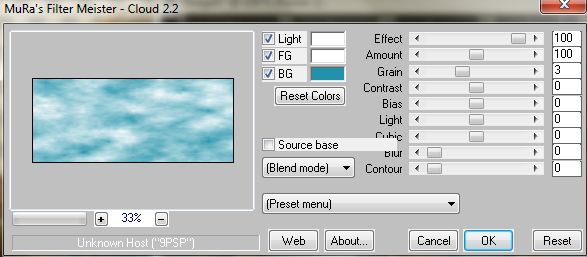
then go to Effects - Plugins - MuRa's Meister - Clouds
with the following settings
(I chose a light blue from my tube as the BG colour)

 photo Muras-Cloudfilter.jpg


Click ok

copy and paste tube of choice
I used the close up version that comes with this tube.

then duplicate this tube
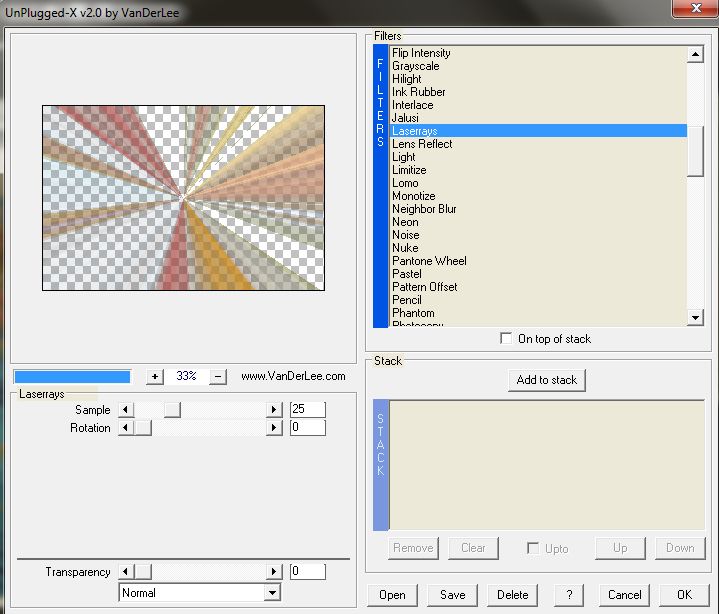
then go to Effects - VanDerLee - UnpluggedX -Laser Rays
with these settings

 photo unpluggedLaserRays.jpg
click ok


slide this layer beneath the main tube layer

then duplicate the main tube again

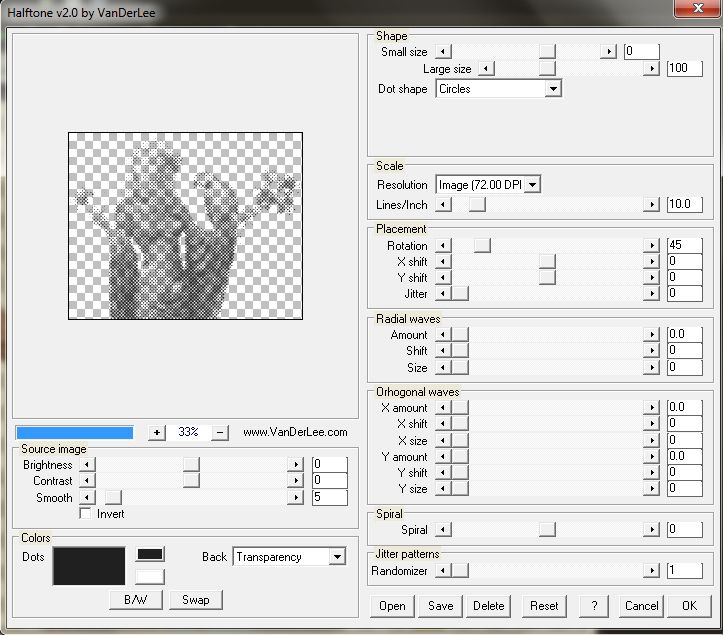
go to Effects - VanDerLee - Halftone
with these settings
  photo Halftone.jpg
click ok

add birds on a branch
(which is also included with this tube)
duplicate this tube layer and repeat the halftone plugin

slide both the halftone layers beneath the main tube layers
and arrange a little to the left

add drop shadows to the main tubes

then go to Layers - Merge Visable

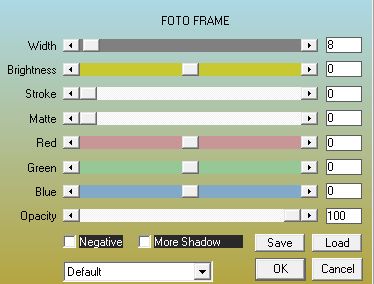
then go to Effects - Plugins-AAA FRAMES-Foto frame 
with these settings
 photo FotoFramesettings.jpg
click ok


then duplicate merged layer 
then go to Layers - Properties- and change the blend mode from normal to overlay

write out your quote
FAKE PLASTIC size 24 colour white
convert to raster layer
* I added a light blue gradient glow *optional*


add name and copyright...
and save your tag. x