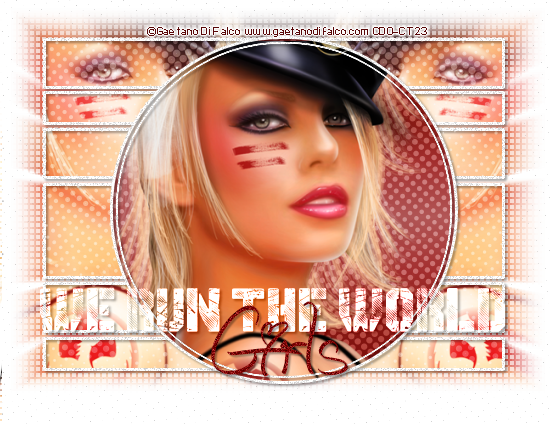
click on the preview to see the tag full size
.......................................................
old school tutorial
you will need the stunning artwork of Gaetano Di Falco
you will need to purchase a licence to use this artists work HERE
you will need the stunning artwork of Gaetano Di Falco
you will need to purchase a licence to use this artists work HERE
Plugins- vanderlee - halftone
if you dont have it just google it and install it
a red gradient, I used Raven from Nansons HERE
a red gradient, I used Raven from Nansons HERE
a fat font of choice, I used Gimme Danger font get it free HERE
I also used the Jellyka - Love and Passion font for the word 'Girls' FREE HERE
EXTRAS AND SNAGS can be found here
in my fotki under CDO
EXTRAS AND SNAGS can be found here
in my fotki under CDO
......................................................................................................
open up a new canvas 550 X 550 PIXELS
first set your material palette with your gradient of choice as the background fill
foreground null - i used mqc raven gradient - from nansons
draw out a rectangle selection with the selection tool

3 squares down and a length you are happy with
I left about 3 or 4 squares of space either side of your canvas
floodfill with your gradient of choice
go to - selections- selections none
then draw out another selection 2 squares in height and same length as before
keep drawing out rectangles and floodfilling with your gradient,
varying the height untill you have 6 in total
leaving space between each one
if you are having trouble with getting the same lengths,
you could do each rectangle on a new raster layer,
just remember to go to Layers - merge visable once you have all 6 done
(remember to end on - selections- selections none this removes any marching ants)
then go to selections - selections all - selections float - expand by 2
add a new raster layer then floodfill all rectangles with white
then go to selections - contract by 3
and hit the delete key on keyboard to remove the excess
selections none
first set your material palette with your gradient of choice as the background fill
foreground null - i used mqc raven gradient - from nansons
draw out a rectangle selection with the selection tool

3 squares down and a length you are happy with
I left about 3 or 4 squares of space either side of your canvas
floodfill with your gradient of choice
go to - selections- selections none
then draw out another selection 2 squares in height and same length as before
keep drawing out rectangles and floodfilling with your gradient,
varying the height untill you have 6 in total
leaving space between each one
if you are having trouble with getting the same lengths,
you could do each rectangle on a new raster layer,
just remember to go to Layers - merge visable once you have all 6 done
(remember to end on - selections- selections none this removes any marching ants)
then go to selections - selections all - selections float - expand by 2
add a new raster layer then floodfill all rectangles with white
then go to selections - contract by 3
and hit the delete key on keyboard to remove the excess
selections none
go to adjust add/remove noise - add noise
using these settings
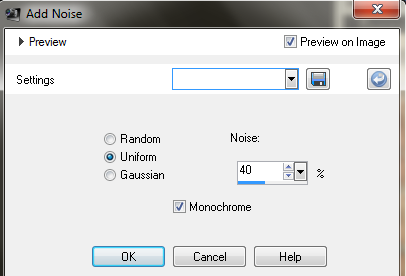
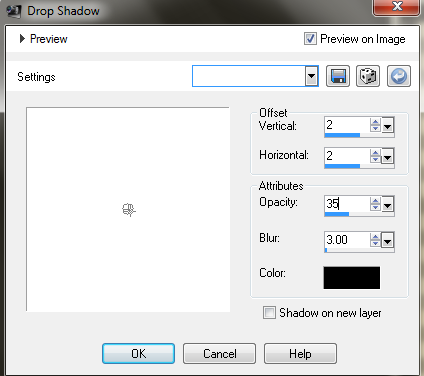
add drop shadow to the white border using these settings
make the red gradient layer the active layer by clicking on it,
go to selections all - selections floatcopy and paste tube of choice to the left side,
hit the delete key to remove the excess
then duplicate this layer
go to image - mirror
and arrange as necassary
go to layers- merge down
then change blend mode to screen
by going to Layers - properties - change the pop up box from normal to screenduplicate this layer twice
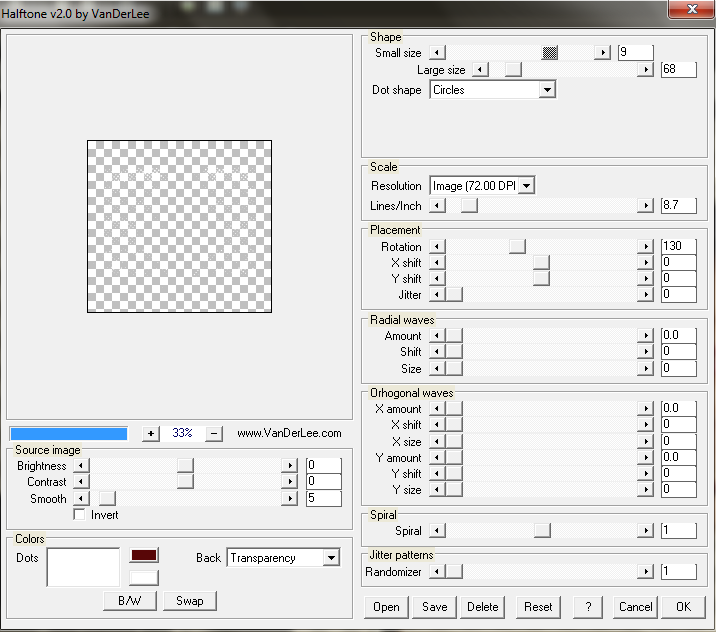
then apply Vanderlee - Halftone plugin
by going to Effects - Plugins - Vanderlee - Halftone
use these settings
change blend mode to soft light
( by going to Layers - Properties - change the pop up from normal to soft light)
add new raster layer
using your selection tool set to circle, draw out a circle then floodfill with red gradient
duplicate the red circle and apply halftone plugin same as before
and change the blend mode to soft light also.
make the bottom red circle the active layer, go to selections all - selections float copy and paste tube as a new layer
go to selections - invert and hit the delete key to remove the excess
selections none
make the bottom red circle the active layer again,
and go to selections all- selections float then go to selections modify - expand by 2
then floodfill with white then go to selections - modify - contract - by 3 hit delete keystill with your circle selected, go to selections - contract by 3 floodfill again,
then contract by 2 hit the delete key to remove the excess...
go to selections nonego to adjust add/remove noise - add noise using same settings as before
add drop shadow, (same as before) to the white circle border layerduplicate red rectangle (merged) layer plus one tube layer
and send both to bottom by going to Layers -arrange - send to bottom
(first the rectange layer then the tube layer)go to layers - merge down
duplicate the merged layer
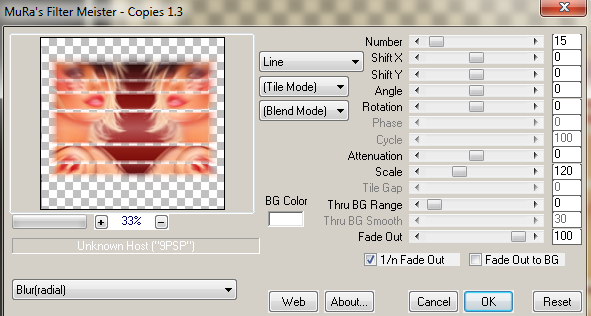
- apply the copies plugin these settings
duplicate this layer
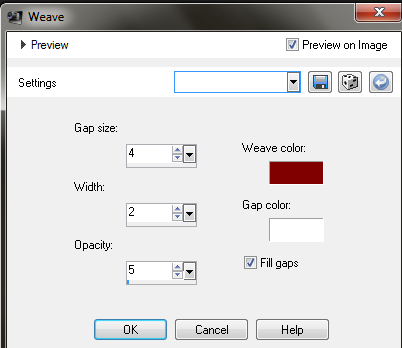
go to effects - 3d effects- weave
add quote/saying, i used Gimme Danger FONT SIZE 30 and set to Bold
background colour white foreground null, stroke 0
write out the text 'WE RUN THE WORLD'
using the Gimme Danger font
add a drop shadow
change the blend mode to Luminance- legacy
then using Jellyka - Love and Passion font size 72 colour red
write out the word 'Girls'
add noise if you want this layer.
add name and copyright...
and save your tag. x





No comments:
Post a Comment