
this tag tutorial was written by me any resemblance to any other tut is purely coincidental

For this tut I am using the fantastic artwork of Elizabeth Austin
you can purchase her tubes from UYA. i used the tube entitled Deliah
Filters used were: Alien Skin xenofex Constellation
and Eye candy5 - impact - perspective shadow
and Eye candy5 - impact - perspective shadow
....................................................
open up a canvas 630 x 630 pixles
I used frame from my Autumn kit if using the same resize by 60% if not resize to suit
then rotate left by 5
click inside frame with the magic wand tool
open up dark brown paper I used one from my Autumn kit no7 and resize by 60% copy and paste as a new layer
go to selections invert and hit delete key on the keyboard
add tube as a new layer, arrange and hit the delete key again to remove the excess
change the blend mode to screen. by going to Layers - Properties - and in the dropdown choose screen
slide below the frame
add light brown paper no7 and apply bigmask2 - number17 by vix
by going to Layers - Load/save mask from disk and choose number17 mask...
click apply or ok. depending on your version of PSP
go to Layers -merge group
slide mask layer beneath the frame
add brown paper no7 again then apply superstar mask by vix
by going to Layers - Load/save mask from disk and choose the superstar mask...
click apply or ok. depending on your version of PSP
go to Layers -merge group
slide mask layer beneath the frame
for Elizabeth's name I used the Monika font size 72
background dark brown no #29221d foreground light flesh colour no #e2cdc8
add main tube then add a drop shadow I used Eye candy5 - impact - perspective shadow
on these settings
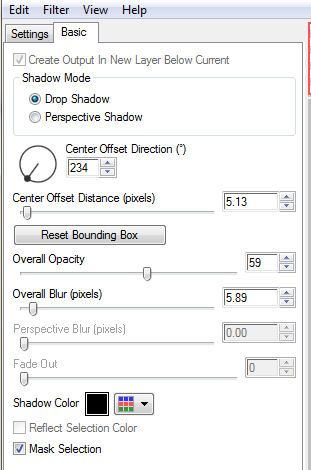
click ok..
with a small paintbrush using a dark colour,
on a ner layer just paint over the the area you want to add sparkles to...
so here is a preview..doesnt look pretty does it...
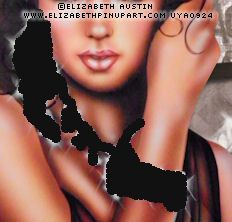
but it will in a minute...
now apply the constellation effect TO THIS LAYER on these settings
go to Effects – Plugins - Alienskin xenofex 2 – constellation,
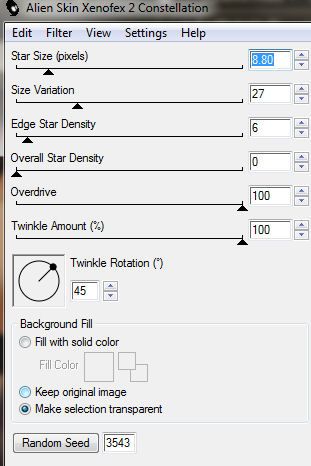
make sure the make selection transparent is selected
and click ok
go to Image - copy merged- and paste into Animation shop as a new animation
back to PSP and click undo,
again go to Effects – Plugins - Alienskin xenofex 2 – constellation, and click the random button,
go to Image - copy merged - and paste into Animation shop after current frame
back to PSP and click undo,
Repeat this process one more time so that you have 3 frames in your animation.
save as a gif and your done.


No comments:
Post a Comment