This tag tutorial was written by me on 23rd March 2012 any resemblance to any other tut is purely coincidental
For this tut I am using the fantastic artwork of Elizabeth Austin
you can purchase her tubes from UYA. i used the tube entitled Man Eater
Animation is a premade one by Patricia - get it on her blog
Filters used were: Xero and VM Transmission
....................................................
open template 110, delete the watermark
make the black background layer of the template the active layer simply by clicking on it
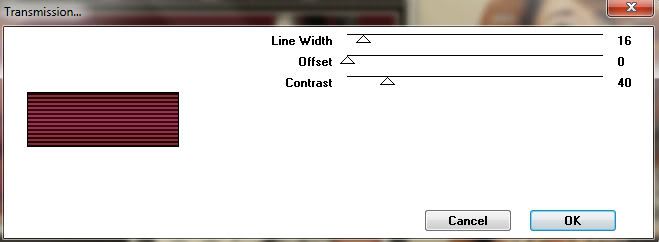
and go to Effects - Filters - VM -Extravaganza - Transmission
with the following settings
click ok
open copy of the tube you want to use,
make it greyscale by going to
Adjust - hue and saturation and set both the hue and saturation to 0 (zero)
then click on the slats layer
go to select all - selections invert -
copy and pate the grey scaled tube as a new layer onto the template
then hit the delete key to remove the excess
merge down by going to Layers - merge down
duplicate this layer and change the blend mode to overlay
do this by going to Layers - Properties change the blend mode from normal to overlay
then merge down again
then go to layers - duplicate
then go to Image - mirror
now arrange both greyscaled slatted images to your liking on either side of the template
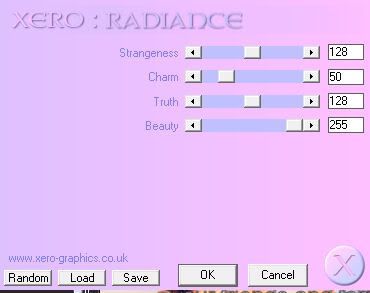
add main tube to center, go to Effects - Plugins - Xero-Radience
and use these settings

move white frame to top by clicking on the white frame layer and
go to Layers - move to top
repeat for the black frame
go to Layers - move to top
then type out the text MANEATER with bank gothic mid font size 72 background fill white
stretch the word width ways so that it stretches across the whole tag
convert to raster and lower the opacity to about 30
i then added my name in white with Dr Carbfred font size 72 also
stretch the word width ways so that it stretches across the whole tag
convert to raster and lower the opacity to about 30
i then added my name in white with Dr Carbfred font size 72 also
add your artist copyright
thats the tag itself made
.................................................
this may not be the way you do animation I am a tad cackhanded when it comes to these things....
I can only tell you how i do things.....if you have a better way please use that. ;)
open the premade animation by patricia in animation shop
you will see it has 57 frames
leave as is for now...
BACK TO PSP
because i placed the animation behind the middle tube
simply X out the top layers, so the top 2 frames of the template,
the copyright, your name and the text maneater and middle tube
then copy merged and paste into animation shop as a new animation
then duplicate this frame 56 times
and Select All
click the propagate patste button (it looks like 3 sheets of paper)
now click on the premade animation by patricia and go to Select All
and copy and paste into your tag
this should add the premade animation to your tag
BACK TO PSP
unhide the top layers that you hid before and then hide the bottom layers
then go to copy merged and paste as as a new animation into animation shop
then copy and paste the tube etc, and paste into selected frame
(because you have them all selected and the propagate paste button down it should paste into all frames the same)
now slide to the first 10 frames of your animated tag and you will see that the animation does not show behind her head for these 10 or so frames....delete these frames as they are not needed
save your tag as a gif with a unique name and you are done...


No comments:
Post a Comment