

for this blend tutorial you will need:
PSP and animation shop
texture no017, I used a fab FREE one from devinant by ARTPLUSLOVE HERE
check out her gallery its awesome here
check out her gallery its awesome here
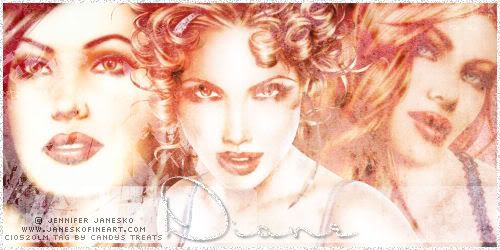
For this tut I am using the artwork of Jennifer Janesko you will need to buy a licence to use this artists work at CDO, I bought my tubes long ago from CILM which is now closed.
.................................................
.................................................
open canvas 500 x 250 pixels floodfill with a white background
copy and paste the texture as a new layer, and arrange so that the line across the texture goes across the bottom of the canvas
copy and paste the texture as a new layer, and arrange so that the line across the texture goes across the bottom of the canvas
arrange 3 images of the same artist to your liking across the canvas, each on a new layer
then duplicate the texture layer and bring to the top
do this by going to - Layers - Arrange - bring to top
then change the blend mode of the top texture to screen by going to
then duplicate the texture layer and bring to the top
do this by going to - Layers - Arrange - bring to top
then change the blend mode of the top texture to screen by going to
layers - properties - change the blend mode from normal to screen
click ok
then add a new raster layer floodfill with white
go to selection all - modify - contract by 3 then
hit the delete button on your keyboard to remove the excess...
click ok
then add a new raster layer floodfill with white
go to selection all - modify - contract by 3 then
hit the delete button on your keyboard to remove the excess...
this should give you a white edge
go to selections - none
then go to adjust - add/remove noise - add noise and
in the pop up menu that appears, make your settings
the same as mine see below...
go to selections - none
then go to adjust - add/remove noise - add noise and
in the pop up menu that appears, make your settings
the same as mine see below...

now is a good time to add your copyright
next, add a new layer and do the same for your name...I used Dr Carbfred font
with the following settings, background white, foreground null
convert to raster layer then duplicate the text
and on the bottom text layer add a drop shadow
i used the following settings

then make the top text layer your active layer simply by clicking on it
then add the same noise settings as before......
you can now save your tag as a jpg.
.............................................................
if you want the glitter effect animated,
go to - copy merged and paste into animation shop as a new animation
go back to PSP
then click undo to remove the noise effect on your name
then add noise again but change the noise setting to 40
go to - copy merged and paste into animation shop after current frame
go back to PSP
then click undo to remove the noise effect on your name
repeat and change noise to 30
go to - copy merged and paste into animation shop after current frame
save as a gif and you are done...
diane xoxox


I have just posted a link to this stunning tutorial on Taggers Lounge to be used in one of our challenges.
ReplyDeleteThank you so much for making it so easy to understand and create.
Hugs
♥Bee♥
Love this tut! Used it as a Challenge on Savage Island. Thank you!! ♥
ReplyDelete