This tutorial was written by me Diane Knight on 20th October
any resemblance to any other tut is purely coincidental
For this tut I am using the fantastic artwork of Keith Garvey
His tubes are available from PTE
you will need PSP, Alienskin xenofex 2 Plugin
Get a demo HERE
mask from vixpsp under goodies - masks i used Vixmask 42 from set 2 but why not treat yourself to all of them they are fab.
unzip your masks and place them in your psp masks folder
flood fill with white
you will need to make your own gradient by combining
two colours from your tube as a Foreground/Background Gradient
Angle 45 Repeat 2 ok flood fill your canvas with the gradient.
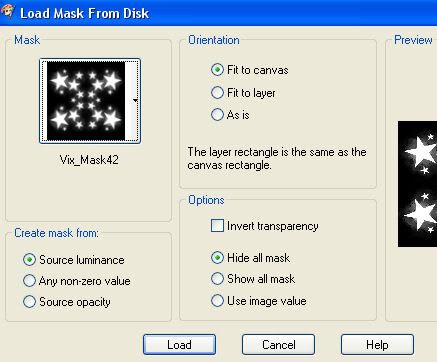
go to Layers - Load save mask from disk ..select the Vix_mask42
with the following settings.
go to layers- merge group
add a drop shadow I used Vertical 1 Horizontal 2 Opacity 60 Blur 6 with a mid blue colour.
copy and paste your tube as a new layer, resize as necessary and add the same drop shadow as before this time in Black.
Add a close up image as a new layer go to Layers - properties and change the blend mode to Luminance legacy and reduce the opacity to about 30-40 %
Add your name i used the same colour Gradient as before.
ok now click on the mask layer and go to
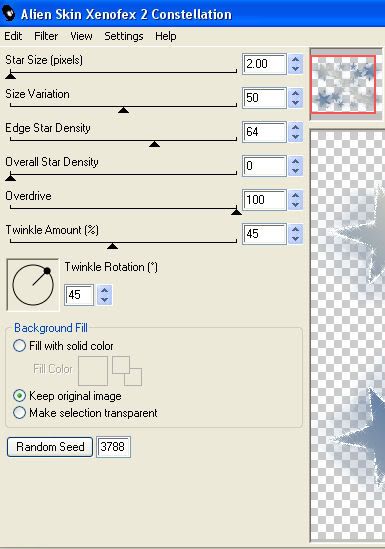
Effects – Plugins - Alienskin xenofex 2 – constellation
With the settings below:
Effects – Plugins - Alienskin xenofex 2 – constellation
With the settings below:
then go to Image - copy merged- and paste into Animation shop
back to PSP and click undo,
again go to Effects – Plugins - Alienskin xenofex 2 – constellation, and click the random button,
go to Image - copy merged - and paste into Animation shop after current frame
back to PSP and click undo,
Repeat this process one more time so that you have 3 frames in your animation.
save as a gif and your done.


No comments:
Post a Comment