
*old tut moved from my tut site*


this is an old school style of tutorial, no scraps no templates
..........................................................
For this tut I am using the fantastic artwork of Keith Garvey
you can purchase his tubes from PTE
for this tutorial you may need a basic knowledge of PSP but i try and make them easy for beginers to understandFor this tut I am using the fantastic artwork of Keith Garvey
you can purchase his tubes from PTE
you will need PSP, i use PSP9
Plugins :
MuRa's Miesta - Copies
Alien Skin Eye Candy 5 - IMPACT - Bevel
Penta.com - Jeans
gradient of choice, loads of niice gradient can be found at Nansons Place
and 2 or 3 tubes
.......................................................
add your new gradients to your gradients folder on your computer
(cos if your anything like me you grabbed the lot lol)
Lets begin......open canvas 600 x 600
floodfill with white
Add a heart shape using the preset shape tool
draw out the heart shape with a gradient of choice as your background fill, foreground should be null.
if you do not have the heart shape tool a heart shape brush or template will work just as good.
now rotate the heart right by approx 10- 15 whatever looks good to you.
once happy with placement, change the blend mode to screen for ALL 3 tubes, by going to Layers - properties - a pop up box will appear change the blend mode from normal to screen
Make a final check you are happy with placement then merge down all 3 tubes
by going to layers - merge down (twice)
next make sure the shape layer is selected and go to
Selections - select all - float then selections invert,
make your tube layer the active layer and hit the delete key on your keyboard.
this should remove all your excess tube hanging over your shape.
selections none to remove the marching ant selection.
now duplicate the merged tube layer , this will make it brighter, if its too bright turn down the opacity a bit. it really depends what tube and what gradient you use...so go with what looks best to you.
close of your white background by clicking on the eye in your layers and merge visable.
now to apply apply the jeans effect, with PENTA.COM plugin

then duplicate the the heart and add a bevel,
go to Effects - Plugins - Eye candy 5 -impact - bevel with the following settings:

before clicking ok change the lighting tab as folows

click ok
almost there...i hope you are following ok so far....
on your bottom heart layer we are going to add the
MuRa's Miesta - Copies filter for the background...
MuRa's Miesta - Copies filter for the background...

click ok
back to your top heart layer that you addef the bevel to...
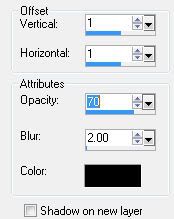
add a drop shadow you like - Effects - 3d effects - drop shadow
now we are going to add the dotted lines, so clic on your pen tool then back to your material pallette:
foreground should be the the colour / gradient you want and background should be null.
choose a custom line style from the drop down box, i chose the diamond one on width 4
settings Below,

make sure the straight mode is selected.

and simply click and drag your line across the canvas making a straight line.
then arrange to liking
convert to raster by going to layers - convert to raster
then arrange to liking
convert to raster by going to layers - convert to raster
add a drop shadow , i used the settings below

add your name or text
on the top tag i used Miss Lankfort font with the same gradient for my backgrond fill and white set at 2 as my foreground colour.
on the bottom tag i used Gothikka font with the same gradient for my backgrond fill and white set at 2 as my foreground colour.
add the artist © information
save your tag and your done.
.................................................
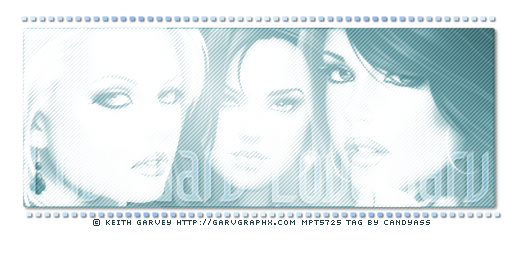
the tag below is another example made using the exact same method but without the bevel plugin or the copies filter and a different colour gradient and I used a rectangle shape instead of a heart I hope you can see the different looks you can get from this one tutorial


No comments:
Post a Comment