*old tut moved from my tut site*

For this tut I am using a tube by Keith Garvey
you need a licence to use this art. You can purchase tubes from PTE
you need a licence to use this art. You can purchase tubes from PTE
no supplies or scraps needed, you will make the enitre tag from start to finish apart from the tube.
so you just need PSP and animation shop.
..........................................................
open canvas 500 x 310
floodfill with black
add a tube of choice, i used a garv but you could use any you like...
copy and paste your tube as a new layer onto your canvas to the right hand side where you want it...see my tag for reference....
then Duplicate it, by going to Layers - Duplicate
then go to Image - mirror
you should now have 2 tubes opposite each other
now click on the origianl tube layer on the right and duplicate that one and leave it on top of the other one...DO NOT MOVE IT...
other wise when you go to animate it, you may find it jumps around because you didnt line it up perfectly....
make sure you left tube is selected in the layers palette , we are going to desaturate the colour, (make it greyscale) do this by going to Adjust - hue and saturation - colourise
set both numbers in the pop up box to '0'
open canvas 500 x 310
add a tube of choice, i used a garv but you could use any you like...
copy and paste your tube as a new layer onto your canvas to the right hand side where you want it...see my tag for reference....
then Duplicate it, by going to Layers - Duplicate
then go to Image - mirror
you should now have 2 tubes opposite each other
now click on the origianl tube layer on the right and duplicate that one and leave it on top of the other one...DO NOT MOVE IT...
other wise when you go to animate it, you may find it jumps around because you didnt line it up perfectly....
set both numbers in the pop up box to '0'
so now you have 2 tubes that are grey scale one on each side,
add a new raster layer and floodfill it with a light grey colour.
then go to selections- slections float - selctions modify - contract
change the number of pixels to 3
and click ok and hit the delete key
now select the magic wand tool and click inside the border you just added, when its selected it will show little marching ants around the selection, no go to Selections Modify - contract by 5...now floodfill with the same grey colour... then Selections Modify- contract by 2 and hit the delete key....
this will add a border without merging all the layers....we dont want to merge because we are going to animate the tag soon...
now add your © information, and your name. for my name i used Ravenscroft font set at the following settings
Background colour Light Grey, foreground colour white
font size 72 Stroke 2 anti alias set to sharp.
then in the same font but on font size 22,
Background Light Grey Forground Null i wrote ''Your Love''
convert this layer to a raster layer...by going to Layers - convert to raster layer...
then write 'Life' in the same font but at size 36 Background WHITE,foreground null
and lastly in pixellette font I wrote ''brings me to life'' change the colour back to grey
with these settings....
with these settings....
by the way...these are also the settings i use to wrote my ©
as it is a nice small but clear font to use.
ok so we have the tag, now to animate it
........................................
first we will make the coloured tube invisible..
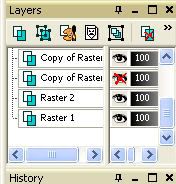
do this by looking at your layers pallette, find your coloured tube and click on the eye symbol, a red cross will appear over the eye, and your tube will disapear from your tag.... see below for the layers pallette..
now copy merged and paste as a new animation into animation shop
back to PSP
and clcik on the eye again to make the coloured tube visable again.
then copy merged and paste after current frame in animation shop...
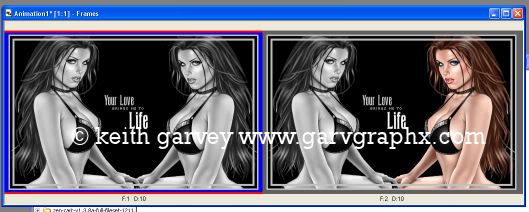
you now have a 2 frame animation .
click on frame 1 to make sure its selected
the one selected is in blue..
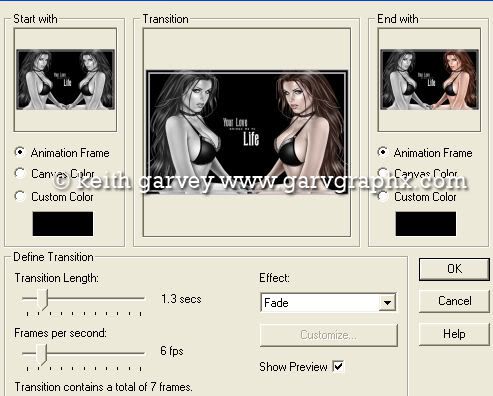
now go to Effects - Insert Image Transition and use the following settings...
now you will have a 9 frame animation.
go to Edit - select all
then Edit - Copy and paste as a NEW ANIAMTION...
now go to select all, then animation reverse frames...
then select all - and go to edit - copy
now go back to the original animation click on the last frame (frame 9) and
paste AFTER current frame....
*close animation 2 you do not need it.*
now i want to slow the animation down on a couple of frames...
.so find Frame 1 and click anywhere inside the frame to select it,
then go to Animation - frame properties
and change the display time to 50
(if you want it to be faster make it 25)
do the same for frame 18 and for frame 9 change to 100
thats it your tag should have a smooth transition from grey to colour...
save as a gif and your done...
I hope you enjoyed my tutorial


No comments:
Post a Comment