

This scrap tag tutorial was written by me Diane Knight on 27th January 2010 any resemblance to any other tut is purely coincidental
things you will need:
PSP im using PSP9 but any version will do
A scrap kit, I used Naughty or Nice Freebie from Addictive Pleasures HERE
For this tut I am using the artwork of Jose A cano you will need to buy a licence to use this artists work at from PTE or use an alternative tube.

................................
unzip supplies
...................................
open up the back journal named ele40 from the kit resize by 70%copy and paste as a new layer onto your canvas, you will notice that
it has a sligt line across the top, its simple to remove this, just
use your erasor tool on 100% opacity, left click till its gone...
once done,add a drop shadow , i used the following settings

now add the white wings, named ele38 go to image mirror then
go to- image rotate, free rotate left by 10% then add a drop shadow of choice.

now open the pink folded ribbon resize by 70% copy and paste ontp your
canvas, arrange to the bottom....see my tag for placement.. add a drop shadow
now open up the pink heart named ele39, resize by 70% and rotate left by 10%
add a drop shadow.
canvas, arrange to the bottom....see my tag for placement.. add a drop shadow
now open up the pink heart named ele39, resize by 70% and rotate left by 10%
add a drop shadow.
next open the pink double hearts with wings resize by 25% copy and
paste onto your canvas, arrange to the bottom....see my tag for
placement..
add a drop shadow
add the words SAINT OR SINNER in my header at the top , or you can
make your own....but if you want mine, its a png so you can simply
just copy and paste it from the header.
add a tube of choice, i used the one from jose a cano. if using the
same tube, i then duplicated the tube, chaged the blend mode to soft light ,
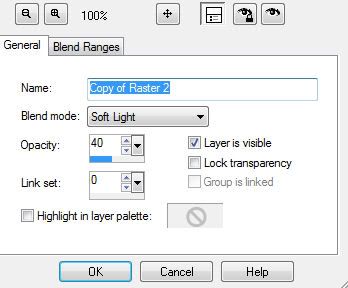
then slide the opacity on the layers pallette (see below) to 40%

now make the original tube layer active by simply clicking on it
add a drop shadow to the origianl tube layer
open up the devil tail from the kit resize by 70%
rotate right by 90%, then go to image - mirror...
copy and paste onto your canvas see my tag for
placement, but make sure you remember to slide the tail layer beneath
the pink heart layer..
font used to add my name, was carpenter, used on these settings

background colour white , foreground null
Then just save as a .PNG with a unique name and your are done!..
thanks for trying my tutorial
till next time Diane xxx


No comments:
Post a Comment