

This wicked the musical inspired tag tutorial was written by me Diane Knight on 11th Jan 2009
any resemblance to any other tut is purely coincidental
For this tut I am using the fantastic artwork of Ted Hammond
This is a pay to use artist so you should not use this artists work without purchasing the appropriate licence to do so - now from CDO HERE
any resemblance to any other tut is purely coincidental
For this tut I am using the fantastic artwork of Ted Hammond
This is a pay to use artist so you should not use this artists work without purchasing the appropriate licence to do so - now from CDO HERE
For this tut you will need PSP, Animation shop and Eye candy 4000
Moonlight Freebie scrap kit made by me available from my blog HERE
WICKED FREEBIE scrap kit also made by me from HERE
font used was Ravenscroft you can get it HERE................................................................................ok onto the tutorial
unzip your suplies, ready for use...
OPEN A NEW CANVAS
600X300
you could make it smaller but i didnt, so we will go with the size i made it..lol
open up ct-moonlightpaper2 and copy and paste it onto your canvas as a new layer...
copy and paste the grey defying gravity ribbon as a new layer onto your canvas,
resize using smartsize by 60% and place towards the top of your canvas.
duplicate this ribbon and place so that both ribbons now cover the top of your canvas,
if unsure see my tag.
now go to Layers - Merge - Merge down
so that the 2 ribbons are merged onto the same layer
repeat for the green defying gravity ribbon. and place at the bottom of the canvas.
now add the close up of the 2 Ted Hammond tubes that you get when you buy this tube from CILM.
and place onto your canvas, see my tag for palcement. add the same dropshadow as before...
now add your © information, and your name. for my name i used Ravenscroft font set at the following settings
Background colour black, foreground colour white
font size 72 Stroke 2 anti alias set to sharp.
600X300
you could make it smaller but i didnt, so we will go with the size i made it..lol
open up ct-moonlightpaper2 and copy and paste it onto your canvas as a new layer...
copy and paste the grey defying gravity ribbon as a new layer onto your canvas,
resize using smartsize by 60% and place towards the top of your canvas.
duplicate this ribbon and place so that both ribbons now cover the top of your canvas,
if unsure see my tag.
now go to Layers - Merge - Merge down
so that the 2 ribbons are merged onto the same layer
repeat for the green defying gravity ribbon. and place at the bottom of the canvas.
now copy and paste the ct-Wicked Wordart2
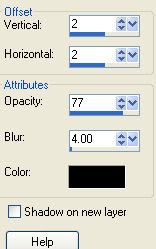
resize by 50% using smartsize. and add a drop shadow, by going to
resize by 50% using smartsize. and add a drop shadow, by going to
Effects - 3d effects - drop shadow. and use the following settings.

now add the close up of the 2 Ted Hammond tubes that you get when you buy this tube from CILM.
and place onto your canvas, see my tag for palcement. add the same dropshadow as before...
now add your © information, and your name. for my name i used Ravenscroft font set at the following settings
Background colour black, foreground colour white
font size 72 Stroke 2 anti alias set to sharp.
now add a small grey border bu going to Image- add borders and use these settings, make sure you change the colour to grey...

ok this part you may find a little tricky if your new to PSP, but we need to tube out the cauldron from the full length tube ....
ok with your freehand tool get rid of the girl we dont need her,

your settings for the freehand tool should be as follows
dont worry it doesnt have to be perfect this time, so dont get too close to the cauldron.
do this by left clicking around the cauldron,with your freehand tool, you should get little marching ants when you join the start point and end point ....double click to end...SEE BELOW...

cut and paste as a new image, now add a new layer and floodfill with a contrasting colour so you can see clearly, i used red.
zoom in to about 300%,
make sure your cauldron layer is active, by clicking on it.
now we want to tube out any residual girl from the cauldron.....you will see in my preview, i have a bit of leg to remove,

select your freehand tool again with the same settings as before. and carefully go round the image outline that you want to remove
hit the delete key twice. this will remove the excess you want to get rid of.
if you look at my preview, you will see what i removed, you do the same.
for the purpose of this tut, do not worry about her foot at the bottom you will not see it in this tag.....
fiddly tubing is over,lol
ok now just copy and paste the cauldron onto your tag....see my tag for placement
now add a drop shadow same as before.......................
now its time to animate....
using your freehand selection tool again, select the green smoke coming from the cauldron, SEE BELOW..
while selected, now and go to
Effects - Plugins - EYE CANDY 4000 - HSB NOISE
and use the following settings....
now its time to animate....

CLICK OK
then go to Selections none...
and go to Layers - copy merged
copy and paste Merged layers into animation shop...as a new animation.
*go back into PSP*
click the UNDO button twice...
you should still have your selection, apply the filter/plugin again with the same settings but this time click random seed once.
click ok
then go to selections none...
Lyers - copy merged..then paste into animation shop AFTER CURRENT FRAME
*go back into PSP*
click the UNDO button twice...
repeat the filter/plugin 1 last time, using the random seed button.
click ok
then go to selections none...
Lyers - copy merged..then paste into animation shop AFTER CURRENT FRAME
you should now have an animation of 3 frames.....
i want to slow the animation down a little
so go to Edit - select all,
then go to Animation - frame properties.
and change the display time to 20, click ok
to check your animation looks ok click the play animation button, its this one see below

if you cant find it, then just go to View - Animation...lol if it looks ok then you are ready to save as a gif and you are done...


hermes birkin
ReplyDeletebape
golden goose usa
Golden Goose
jordan shoes
jordan 6
hermes handbags
kyrie 6 shoes
kyrie shoes
yeezy shoes
adidas yeezy
ReplyDeletekyrie irving shoes
supreme clothing
palm angels outlet
supreme shirt
off white nike
bapesta
kyrie 8
off white clothing
golden goose
Thanks and I have a super supply: How Much Is A Complete House Renovation house renovation cost
ReplyDeleteThis tutorial is very helpful for learning how to create tags.
ReplyDeletejvgje642kfa
ReplyDeletegolden goose outlet
golden goose outlet
golden goose outlet
golden goose outlet
golden goose outlet
golden goose outlet
golden goose outlet
golden goose outlet
supreme outlet
golden goose outlet