

SUPPLIES NEEDED:
3 tubes of choice... 1 cop plus 2 headshots from the same artist,
I used Keith Garvey you must have a licence to use this artists work
these days you can buy from PTE HERE
I also used my own - Candys Treats - CSI scrap kit,
its a PTU kit and is available from the following stores
OPEN UP A NEW CANVAS 600 X 600 PIXELS
open up palm print from the kit,yes thats my palm!!!! he he
go to Image - mirror
and copy onto your canvas as a new layer
now open up CSI mess, copy onto canvas, then dupliacte it and resize
by 70% using smartsize, then go to Image Mirror and arrangeto the right side.
open up the evidence ribbon resize by 70% and copy and paste as a new layer onto the canas,
add a drop shadow, repeat this with the ribbon untill you have 8 ribbon's in a line
open up the fingerprint card resize by 50% then go to Image - Rotate -free roatate left by 20%
add a shadow
open up the wordart spiral in the word art folder and copy and paste as a new layer
open up the shabbyfolder from the kit resize by 70% add as a new layer , add a drop shadow
now open up paper6 from the kit resize by 60% ...leave open for now...
next open up shabbypolaroid2 frames from the kit and resize by 70%
and copy and paste as a new layer ontop of the shabby folder
then click inside the frame with your magic wand tool, holding down the shift key to select both
frames at once - go to selections expand by 2
copy and paste the paper as a new layer then go to selections - invert
and hit the delete key to remove the excess from around the frame
go to selections - none
slide this paper layer beneath the frame
now to follow the steps above for the 2 headshots, this time just do 1 frame at a time though....
I wanted the headshots black and white , to do this go to
Adjust- hue saturation - colourise and slide both to zero.

then duplicate the tube layer and
go to Layers - properties - overlay
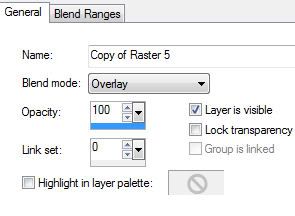
go to Layers - properties - overlay

which will just add to the contrast and make it stand out more.
...............................................................
ok now to add the blue tape, magnifying glass then the handcuffs andlast the brush,
which i also rotated right by 20%...
which i also rotated right by 20%...
resize each by 50% and add a drop shadow to each
add a fingerprint of choice there are 4 to choose from in the kit, add
this on a new layer and slide beneath the magnifying frame layer, I
duplicated mine to make it look darker.
now add the main cop tube, add a drop shadow and arrange to the side
the add the crime scene ribbon resize by 70% and add a drop shadow. arrange to the bottom of her legs
add your copyright and your name
for my name I used a free font called Laudromat on these settings
for my name I used a free font called Laudromat on these settings

I hope you liked my tutorial
till next time Diane x


No comments:
Post a Comment