hiya blogettes, I have just made this tag using my new tubes
from Barbara Jenson's that i picked up in her recent sale
got to say her artwork is simply stunning!..
I figured I woud write up a quick tut on it for those that would like to try it.....
supplies I used....Crimson tube by Barabara Jenson tube from her site HERE
Scrap kit by me - Blooming Lovely, you can purchase it from TWILIGHT SCRAPS HERE
MASK FROM VIXPSP HERE
add it to you masks folder
...........................................................
ok lets begin.....
open up a new canvas 600 x 600, you can always crop it later..
open up paper1 from the kit, resize using smartsize by 70%
then copy and paste as a new layer onto your canvas.
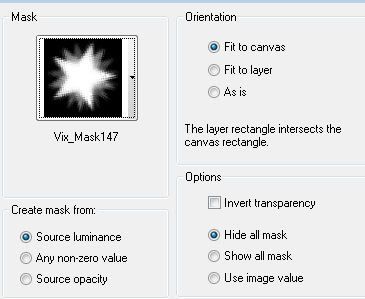
now apply the mask by going to Layers- load/save mask
Load from disk , a pop up will appear
see below for screenshot of my settings
see below for screenshot of my settings
then click Load or apply button
now go to Layers - merge group
open up the ct-bl-sprinkles from the kit
resize by 70% and arrange to the top then duplicate the layer and
arrange this one to the bottom....
open up frame 4 resize by 70% and add as a new layer to the canvas
click inside this frame with the magic wand tool and go to modify - expand by 3
then open up paper 5 from the kit and resize by 60% copy and paste the paper as a new layer onto the canvas and go to selections invert ,
hit the delete button to remove the excess from outside of the frame.
then go to selections none to remove the selection
next open up the natural frame from the kit resize by 70% and add as a new layer to the canvas
add a drop shadow
open up ct green1 from the kit and arrange so that it pokes out from the left side near the top
slide this layer beneath the frames and paper.
open up the grass from the kit, resize by 70% add to canvas,
then open up heartblooms resize by 60%
go to image - mirror, then add to canvas...see my tag for placement..
add a drop shadow as before
open up ct-flowerspray, resize by 60% and add as a new layer to your canvas.
add tube of choice if using the same one as me, then no need to resize
just add to your canvas as a new layer slide this layer beneath the flowerspray layer
then with your erasor tool erase the bottom of the tube that pokes out from beneath the frame.
these are the settings i used for the erasor tool

if you make a mistake , not to worry just click the UNDO botton...
add your name I used a font called , 1Beansprout DNA you can get it free HERE
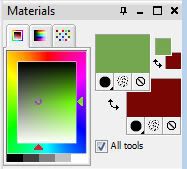
this is your material pallete, choose a green for the foreground and red for the background
see my screenshot...
then your settings for the font are as follows,

now simply type out your name,
convert the layer to a raster layer and add a drop shadow
add your copyright and save your tag...
thanks for looking...
hugz diane x


No comments:
Post a Comment