
here is another simple no scraps or templates tutorial,
I hope you enjoy it...

This tutorial is a pretty simple tag tutorial using plugins and shapes in psp ....written by me on 13th April 2011 any resemblance to any other tut is purely coincidental.
For this tut I am using the fantastic artwork of Dean Lee Norton
you can purchase his tubes from UYA
you can purchase his tubes from UYA
I used the tube entitled Rainbow Bright
plugins used: Toadies Weaver
font used : JaneAusten...........................................................
duplicate tube layer
then make sure your material pallette foreground and background are both set to white
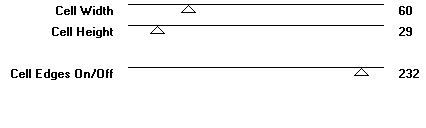
ok now, go to Effects - 3d effects - plugins - toadies - weaver
with these settings
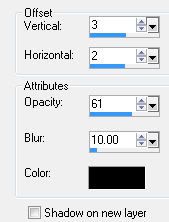
add a drop shadow to your top tube layer,
I used the following settings
now add a new raster layer and choose your shape tool, select the square shape, see below

make sure your material pallette - background black - foreground null
and draw out a small square on your canvas
convert layer to raster layer
then go to selections all - selections float - selections - modify - contract by 6
then hit the delete key on your keyboard,
you shoud be left with a small black box frame ..duplicate the box frame 3 times so you now have 4 boxes,
arrange them in a straight line then go to layers - merge down 3 times
so all the boxes are on the same layer then slide this layer beneath the tube layer
next choose the magic wand tool and click inside the first box
go to selections modify expand by 2
add image of choice as a new layer, I used different parts of the same tube in each box , when happy with your selection, go to selections invert and hit delete key to remove the excess, repeat this process for all boxes....
make the top tube layer active simply by clicking on it, duplicate it then change the properties from normal to soft light
add your name and copyright....
for my name I used JaneAusten font using these settings

material pallette set as follows:
Background colour set to Black foreground set to pink
hugz diane x
Open a 600 x 600 canvas & floodfill white.
if using the same tube, resize using smartsize by 80%duplicate tube layer
then make sure your material pallette foreground and background are both set to white
ok now, go to Effects - 3d effects - plugins - toadies - weaver
with these settings

add a drop shadow to your top tube layer,
I used the following settings

now add a new raster layer and choose your shape tool, select the square shape, see below

make sure your material pallette - background black - foreground null
and draw out a small square on your canvas
convert layer to raster layer
then go to selections all - selections float - selections - modify - contract by 6
then hit the delete key on your keyboard,
you shoud be left with a small black box frame ..duplicate the box frame 3 times so you now have 4 boxes,
arrange them in a straight line then go to layers - merge down 3 times
so all the boxes are on the same layer then slide this layer beneath the tube layer
next choose the magic wand tool and click inside the first box
go to selections modify expand by 2
add image of choice as a new layer, I used different parts of the same tube in each box , when happy with your selection, go to selections invert and hit delete key to remove the excess, repeat this process for all boxes....
make the top tube layer active simply by clicking on it, duplicate it then change the properties from normal to soft light
add your name and copyright....
for my name I used JaneAusten font using these settings

material pallette set as follows:
Background colour set to Black foreground set to pink
hugz diane x


Thank you so much Diane for this great tut, I used different tube and colors, and made an avatar too, made that and the tag animated, love to animated. I do hope you like the set
ReplyDeleteAvatar :
https://media.fotki.com/2v2Eb6T9gxwDe7d.gif
Tag :
https://media.fotki.com/2v2Eb6TcqxwDe7d.gif
Hugs, Betsy E.xxx