This simple blend style tag tutorial was written by me on 06th March 2011 any resemblance to any other tut is purely coincidental
For this tut I am using the fantastic artwork of Steve Baier
you can purchase his tubes from UYA. i used the tube entitled magic touch
texture 16 needed from keymoon at deviantart HEREFor this tut I am using the fantastic artwork of Steve Baier
you can purchase his tubes from UYA. i used the tube entitled magic touch
fonts used were poplar std and miss lankfort both are PTU fonts sorry but alot of the best fonts are....
Lets begin......
open canvas 500 x 250
floodfill with white
copy and paste the texture onto your canvas
add tube of choice to canvas as a new layer and arrange to the left if using the same tube as me you will need to got to image - mirror so that she faces the right way....
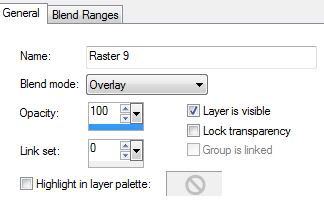
ok now go to
Layers- properties and change the blend mode to OVERLAY

add tube again as a new layer resize by 80%
add a drop shadow
so now we will add some text, set your font to Popular size 48
set your material pallette background fill to white foreground null
now type the words 'WANT ME' using capital letters in
the poplar front, size 48 then convert to raster
layer, then change the blend mode to soft light
if unsure do this by going to Layers-properties -
change the blend mode to soft light
ok now change the background fill to purple
then type out 'you know you' in miss lankfort font
size 48 , add a drop shadow to this text
i used 1 -1 opacity 44 blur 8
floodfill as a new layer with purple
then go to
select all - modify - contract by 2 then hit the delete key,
you should be left with small border around the edge ...
add your name and the artist © information
save your tag and your done.
Till next time
Diane x


No comments:
Post a Comment