

click on the image to see the full size...
..........................................................................
For this tag I am using the fantastic artwork of Elias Chatzoudis
you can purchase tubes from PTE HERE
template 18 by Scrapity Scrap HERE
Mask 53 by Weescotslass HERE
Gradients of choice I used Berry by Nanson HERE
other great resources for gradients are Deviantart or Michelle's
Mask 53 by Weescotslass HERE
Gradients of choice I used Berry by Nanson HERE
other great resources for gradients are Deviantart or Michelle's
plugin - VM TOOLBOX - GRID
........................................................
UNZIP SUPPLIES
open up template 18
add a new layer floodfill with white and send this layer to the bottom
by going to Layers - arrange - send to bottom
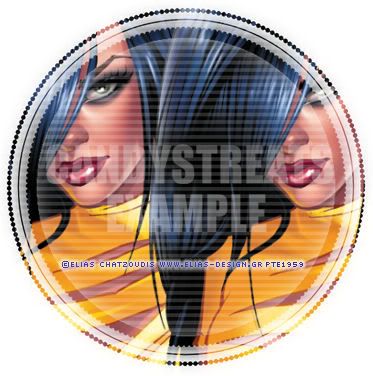
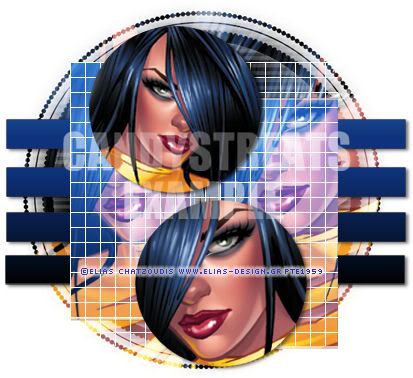
copy and paste close up images side by side then apply the mask by weescotlas number 53
see preview below
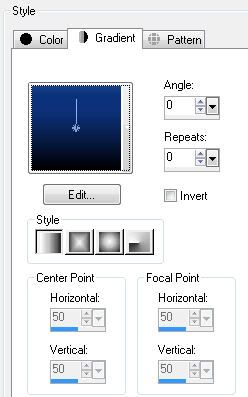
then in your material pallette choose the tab gradients and find the one called mqcberry check your settings are the same as mine below and click ok
then make the slats layer the active layer, now floodfill the slats with this gradient.
go to selections none
repeat for the rectangles with the same gradient
then with the rectangles still selected
add more close up tubes on new layers to cover the rectangles,
then go to selections invert and while the tube is the active layer hit delete the remove the excess.
selections none
change the blend mode to screen by going to layers - properties - change the blend mode from normal to screen
select the berry gradient rectangles again by going to selection - select all - float and then
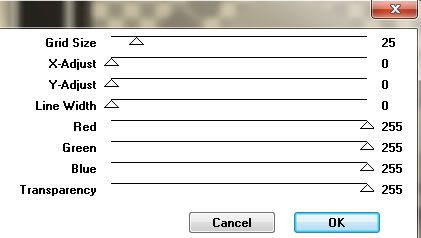
apply the filter to the gradient rectangle layer by going to Effects - plugins - VM Toolbox - grid and apply the following settings - you want the grid size approx 25
then duplicate this layer and move it above the tube layers
then change the blend mode from normal to screen
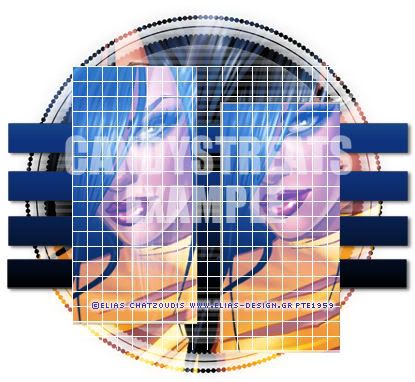
you should now have something that looks like this ....
now make one of the circles the active layer go to selections - float and copy and paste your close up tube as a new layer then go to selections invert and hit the delete key to remove the excess
selections none
repeat for the other circle
you should have something that looks like this so far..
now add the main full length tube and resize by 80% using resize and add a drop shadow then slide this layer below the circles
Then write out the text IN YOUR DREAMS in capitals using the font Impact set on size 72
background white foreground null
add a drop shadow then lower the opacity to 50%
ok next make the top left circle swirl the active layer and floodfil with a yellow gradient I used one called yellow leaves, but any colour that goes with the tube will do.
with the selection still active add your full length tube again and again as a new layer each time, over the selected circles try and make the placement interesting....if you do this working right to left you wont have to mess with it, but if you work left to right you might have to erase some of the tubes that overlap in places....I suggest you work right to left ;)
once happy go to selections invert hit the delete key to remove the excess
then selections none
then go to layers - merge down till the circle swirl is on one layer again.
then duplicate it
then mirror and flip it and arrange over the bottom circle swirl, you can always delete the bottom circle swirl as you dont need it now anyway.
ok add your name, copyright and save your tag
open up template 18
add a new layer floodfill with white and send this layer to the bottom
by going to Layers - arrange - send to bottom
copy and paste close up images side by side then apply the mask by weescotlas number 53
see preview below

once happy - merge group by going to Layers - merge - merge group
then in your material pallette choose the tab gradients and find the one called mqcberry check your settings are the same as mine below and click ok

then make the slats layer the active layer, now floodfill the slats with this gradient.
go to selections none
repeat for the rectangles with the same gradient
then with the rectangles still selected
add more close up tubes on new layers to cover the rectangles,
then go to selections invert and while the tube is the active layer hit delete the remove the excess.
selections none
change the blend mode to screen by going to layers - properties - change the blend mode from normal to screen
select the berry gradient rectangles again by going to selection - select all - float and then
apply the filter to the gradient rectangle layer by going to Effects - plugins - VM Toolbox - grid and apply the following settings - you want the grid size approx 25

then duplicate this layer and move it above the tube layers
then change the blend mode from normal to screen
you should now have something that looks like this ....

now make one of the circles the active layer go to selections - float and copy and paste your close up tube as a new layer then go to selections invert and hit the delete key to remove the excess
selections none
repeat for the other circle
you should have something that looks like this so far..

now add the main full length tube and resize by 80% using resize and add a drop shadow then slide this layer below the circles
Then write out the text IN YOUR DREAMS in capitals using the font Impact set on size 72
background white foreground null
add a drop shadow then lower the opacity to 50%
ok next make the top left circle swirl the active layer and floodfil with a yellow gradient I used one called yellow leaves, but any colour that goes with the tube will do.
with the selection still active add your full length tube again and again as a new layer each time, over the selected circles try and make the placement interesting....if you do this working right to left you wont have to mess with it, but if you work left to right you might have to erase some of the tubes that overlap in places....I suggest you work right to left ;)
once happy go to selections invert hit the delete key to remove the excess
then selections none
then go to layers - merge down till the circle swirl is on one layer again.
then duplicate it
then mirror and flip it and arrange over the bottom circle swirl, you can always delete the bottom circle swirl as you dont need it now anyway.
ok add your name, copyright and save your tag
I hope you understood and enjoyed this tutorial
diane x
diane x


Very cool tut, thank you!
ReplyDelete