

scraps used my New Years Freebie available on my Scraps blog HERE
I recoloured some of the elements gold, to match the tube..I will show you how.
tube is by Arthur Crowe called Happy Sexy New Years you must purchase his tubes to use them HERE
it comes with layers . and close ups for you to customise
I used 2 masks, download Vix_Masks 141-180 pack by VixPSP HERE
download mask pack 40-50 by Vabs HERE
add masks to your mask folder..
......................................................................
open up a canvas roughly 600x600 pixels
open up a canvas roughly 600x600 pixels
open up paper1 (the red one) from my new years kit
copy and paste as a new layer onto your canvas
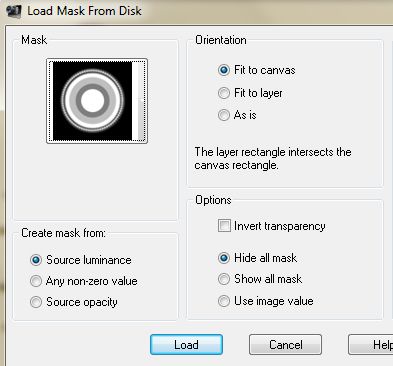
then apply Vix mask number
by going to Layers - Load/save mask to disk
select mask number176
select mask number176

click ok or load depending on your version of PSP
then go to layers- merge - merge group
open up glitter rays from the kit
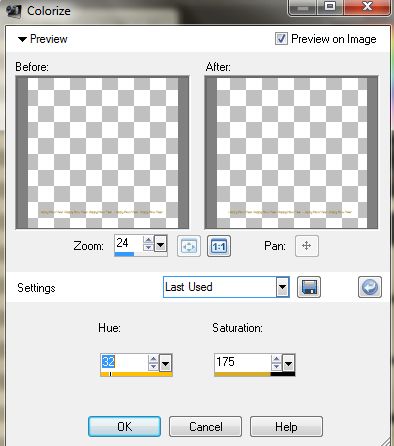
recolour it by going to adjust - hue and saturation -Colorize
recolour it by going to adjust - hue and saturation -Colorize
settings are as follows
duplicate this layer then go to Images - mirror
then go to Layers- merge down
next add the clock frame from the kit as a new layer
recolour this gold by going to adjust -hue and saturation - colourize settings are as before
then using your erasor tool set to size 250 hardness around 70

and erase the glitter rays from the layer below from inside the frame area
open up paper4 (gold) from my new years kit
remove the excess that overhangs the clock frame
change blend mode of the tube to screen
by going to Layers- Properties and change the blend mode from normal to Screen
duplicate this tube layer
open up full length resize by 70%
open up word art1 recolour it by going to adjust- hue and saturation - colorize settings are as before
copy and paste as a new layer onto your canvas
then duplicate 3 or 4 times to fill the background the length of the tube
then merge down till all word art is on one layer
change the blend mode to multiply,
then slide the word art layer between the 2 closeup tube layers
open up paper1 (red) and use this as your pattern fill set at 50% for the background fill for your text
FOREGROUND SET TO NULL
I used the font Lamplighter Script set to 72
type out the text - Happy New Year
Add a drop shadow
add artist's copyright
save your tag as a png and you are done

duplicate this layer then go to Images - mirror
then go to Layers- merge down
next add the clock frame from the kit as a new layer
recolour this gold by going to adjust -hue and saturation - colourize settings are as before
then using your erasor tool set to size 250 hardness around 70

and erase the glitter rays from the layer below from inside the frame area
open up paper4 (gold) from my new years kit
copy and paste as a new layer onto your canvas
then apply Vabs mask number
by going to Layers - Load/save mask to disk
select mask number 43
select mask number 43

click ok or load depending on your version of PSP
then go to layers- merge - merge group
open up close up tube resize by 80% using smartsizeremove the excess that overhangs the clock frame
change blend mode of the tube to screen
by going to Layers- Properties and change the blend mode from normal to Screen
duplicate this tube layer
open up full length resize by 70%
open up word art1 recolour it by going to adjust- hue and saturation - colorize settings are as before
copy and paste as a new layer onto your canvas
then duplicate 3 or 4 times to fill the background the length of the tube
then merge down till all word art is on one layer
change the blend mode to multiply,
then slide the word art layer between the 2 closeup tube layers
open up paper1 (red) and use this as your pattern fill set at 50% for the background fill for your text
FOREGROUND SET TO NULL
I used the font Lamplighter Script set to 72
type out the text - Happy New Year
Add a drop shadow
add artist's copyright
save your tag as a png and you are done


hermes birkin
ReplyDeletebape
golden goose usa
Golden Goose
jordan shoes
jordan 6
hermes handbags
kyrie 6 shoes
kyrie shoes
yeezy shoes
jordan shoes
ReplyDeletegoyard outlet
hermes handbags
off white
off white nike
fear of god clothing
hermes belt
jordan outlet
kyrie 7
supreme clothing
Wishing you a wonderful and prosperous New Year, Best Pc Cheap Arthur Crowe May it be filled with joy, success, and memorable moments.
ReplyDeleteشركة تسليك مجاري بالدمام Xw3v4TY0tH
ReplyDeleteتركيب جبس بورد جازان
ReplyDeletejswUYLn2TD