

Click on the tag to see it as it in full....
Supplies needed:
tube of choice, i used art by Jamie Kidd which i bought from CILM
but is now available from CDO
Supplies needed:
tube of choice, i used art by Jamie Kidd which i bought from CILM
but is now available from CDO
weescottslass mask 230 get from her blog HERE
snow animation supplied HERE This has been kicking about since 2009 and
no one seems to know where it is from originally so if its yours let me
know as i would love to give proper credit
PTU CLASSY & FABULOUS KIT is mine
link to my blog HERE all my store link's are there
1st you need to UNZIP the supplies add add the mask to your mask folder
0PEN UP A NEW CANVAS 650 x 650- you can always crop later,
Floodfill with white
open up cluster frame from the kit- called
CandysTreats-Cluster1ts.png add a drop shadow
resize using smartsize by 90%
open up paper 16 from the kit and copy and paste it
as a new layer onto your canvas slide this layer underneath the frame layer
*if you are not sure how to do this, then just go to layers - arrange - send to bottom*
go to Layers - Load/save mask - load mask from Disk and select the mask called
weescottslass mask 230 with the following settings.

click load then go to layers - merge group
then copy and paste as a new layer overlay4 from the kit
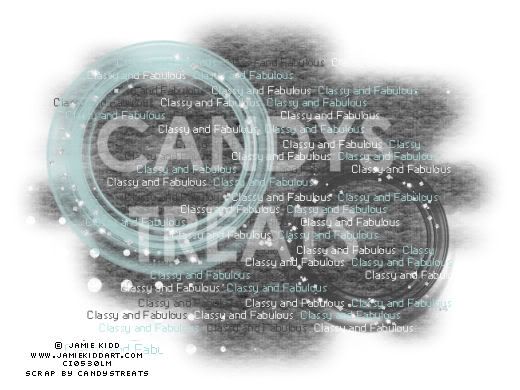
should be looking like this so far...
should be looking like this so far...

if using the same tube as me , you dont have to...any close up image with pretty eyes will do...
but if you are then copy and paste the back close up image from the tube
use your selection tool set to Circle , feather2, see my screen shot ,

select a circle around each eye and the lips, do the 1st one.. then hold down the shift
key to select the 2nd and 3rd and keep them all selected at the same time
then go to selections - invert and hit the delete key on your keyboard...this will delete the excess
then go to selections none
if you make a mistake, dont stress just hit undo and start again.
ok now still on the tube layer,
go to adjust - hue and saturation and slide both sliders to zero, which will greyscale the image..

now i wanted the eyes to pop a little more so duplicate it,
by going to- layers - duplicate
go to layers - properties and change the blend mode from normal to soft light...
open up the blue circle from the kit called CandysTreats-toc-Circle3.png resize by 50% using
smartsize then copy and paste as a new layer onto your canvas slide beneath the frame layer arrange
to the left side do the same for the black circle, resize this one by 40% and slide this layer beneath both the frame and tube layers arrange to the rght
open up WA4 from the kit and resize by 50% and add to your canvas to the left
add your copyright and name with a font of choice
.......................................................
ok now to add the animated snow...
launch Animation Shop..
launch Animation Shop..
ok back to PSP...because of the layers this is a
litle tricky for beginners , but hopefully you can follow me...
litle tricky for beginners , but hopefully you can follow me...
personally i didnt want to just add the snow over the top of the entire tag....
so time to close some layer's
*its important to know that once begin to animated DO NOT MOVE ANYHTING,
*its important to know that once begin to animated DO NOT MOVE ANYHTING,
as this will make your image etc appear to jump all over the place..*
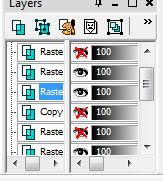
red crosses mean that layer is invisible...i want you to
close off the frame and both tube layers , plus your copyright and name layers.
so when done you shoud have something that looks like this to go over to AS
so when done you shoud have something that looks like this to go over to AS

do this by simply clicking on the little eye of the layer you want to make invisible

copy merged whats left then copy as a new animation into animation shop...
this will be your 1st frame, now just copy and paste this frame after current animation,
keep doing this till you have 10 frames. then go to Edit - Select All
ok now open up the snow animation supplied
go to edit - select all and copy then paste into selected frame of your tag
make sure propagate paste button is pressed, this should add the snow animation to your tag.
back to PSP , time to close off all the background layers and
make your frame and tube layers visible only ...
make your frame and tube layers visible only ...
just click on the red cross to make layers visible again
once you have the tube, frame copyright and name layers visable only
copy merged into animatin shop as a new animation
copy merged into animatin shop as a new animation
copy this frame and then paste after current animation, repeat the same preocess keep doing this till you have 10 frames.
then go to edit - select all
then copy and paste into selected frame over your tag and save as a gif
hope this made sense.....
thanks diane x
hope this made sense.....
thanks diane x


Love Love LOVE it!!!
ReplyDelete